
Audi Q3: Wheel Housing Liner
Overview - Front Wheel Housing Liner
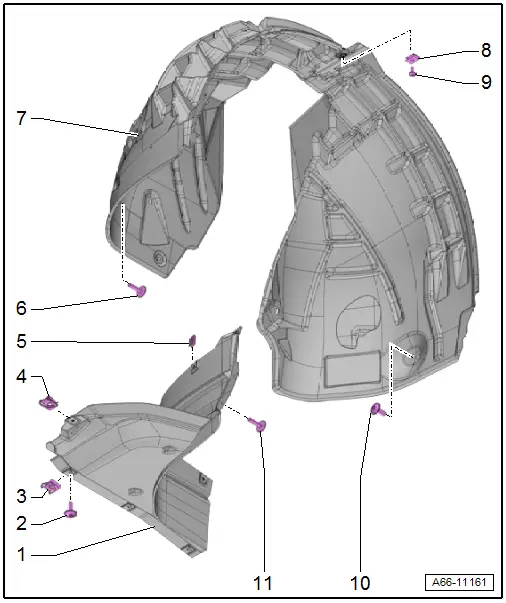
1 - Front Wheel Spoiler
- Removing and installing. Refer to → Chapter "Front Wheel Spoiler, Removing and Installing".
2 - Bolt
- 2.5 Nm
3 - Metal Nut
4 - Spring Nut
- For the quick release
- Quantity: 3
5 - Metal Nut
- Quantity: 4
6 - Bolt
- 2.5 Nm
- Quantity: 2
7 - Front Wheel Housing Liner
- Removing and installing. Refer to → Chapter "Front Wheel Housing Liner, Removing and Installing".
8 - Bracket
- For the wheel housing liner to the fender
9 - Bolt
- 2.5 Nm
10 - Bolt
- 2.5 Nm
- Quantity: 11
Overview - Rear Wheel Housing Liner
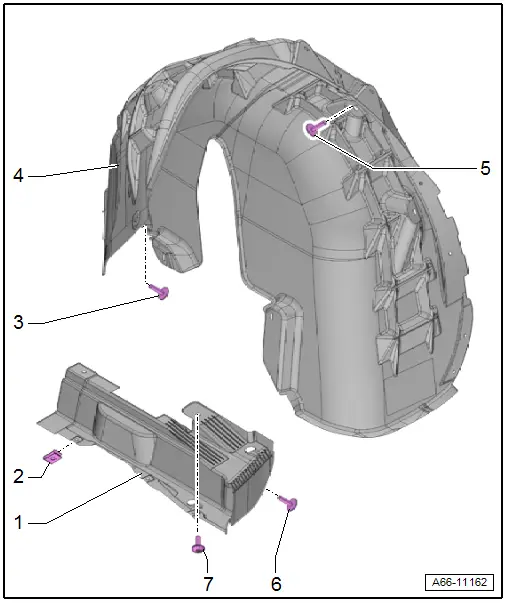
1 - Rear Wheel Spoiler
- Removing and installing. Refer to → Chapter "Rear Wheel Spoiler, Removing and Installing".
2 - Metal Nut
- Quantity: 5
3 - Bolt
- Quantity: 2
- 2.5 Nm
4 - Rear Wheel Housing Liner
- Removing and installing. Refer to → Chapter "Rear Wheel Housing Liner, Removing and Installing".
5 - Bolt
- 2.5 Nm
- Quantity: 10
6 - Bolt
- 2.5 Nm
7 - Bolt
- 2.5 Nm
Front Wheel Housing Liner, Removing and Installing
Front Wheel Housing Liner, Removing and Installing
Removing
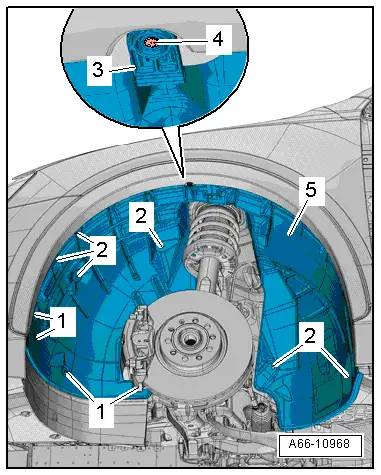
- Remove the bolts -1 and 2-.
- Remove the bolt -4- and then disengage the bracket -3- on the fender.
- Remove the wheel housing liner -5-.
Installing
Install in reverse order of removal.
Front Wheel Spoiler, Removing and Installing
Removing
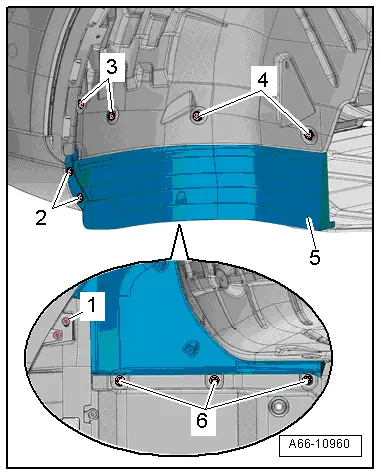
- Remove the bolts -1 to 4-.
- Loosen the quick release fastener -6- and remove the wheel spoiler -5-.
Installing
Install in reverse order of removal.
READ NEXT:
 Name Badges and Emblems
Overview - Name Badges and Emblems
Overview - Name Badges and Emblems, Vehicles through MY 2014
1 - Audi Rings
Removing and installing. Refer to
→ Chapter "Front Emblem, Rem
Trailer Hitch
Overview - Trailer Hitch
1 - Grommet
For the cable
2 - Bolt
Quantity: 4
Tightening specification. Refer to
→ Chapter "Overview - Impact Member".
3 SEE MORE:
Distance warning
Description
Applies to: vehicles with distance warning
Fig. 106 Instrument cluster: display of the current distance
Fig. 107 Instrument cluster: distance warning
General information
At speeds above approximately 40 mph (65
km/h), this function measures the distance to
the vehicle ahead as time. If
Airbag System
Component Location Overview - Airbag System
1 - Airbag Control Module -J234-
Overview. Refer to
→ Chapter "Overview - Airbag Control Module".
2 - Airbag Indicator Lamp -K75-
Component location: inside the instrument cluster
Cannot be replaced separately
