Audi Q3: Overview - Wheel Bearing
Overview - Wheel Bearing, Vehicles with FWD
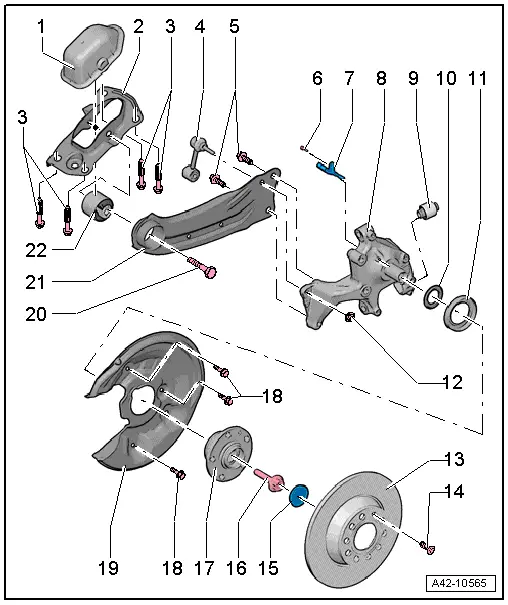
1 - Cover
2 - Bracket
3 - Bolt
- 50 Nm + 45º
- Always replace if removed
4 - Coupling Rod
5 - Bolt
- 90 Nm + 45º
- Always replace if removed
- Follow the tightening sequence. Refer to
6 - Bolt
- Tightening specification. Refer to → Brake System; Rep. Gr.45; Sensors; Overview - Rear Axle Speed Sensor.
7 - Left Rear ABS Wheel Speed Sensor -G46-
- Removing and installing. Refer to → Brake System; Rep. Gr.45; Sensors; Right/Left Rear ABS Wheel Speed Sensor G44/G46, Removing and Installing.
8 - Wheel Bearing Housing
- Removing and installing. Refer to → Chapter "Wheel Bearing Housing, Removing and Installing, FWD Vehicles".
9 - Bonded Rubber Bushing
- Replacing. Refer to → Chapter "Wheel Bearing Housing Bonded Rubber Bushing, Replacing, FWD Vehicles".
10 - Washer
- Installed depending on the market. For allocation. Refer to the Parts Catalog
11 - Wheel Bearing Seal
- Installed depending on the market. For allocation. Refer to the Parts Catalog
- Note the installed position. Refer to
12 - Nut
- 45 Nm
- Always replace if removed
13 - Brake Rotor
14 - Bolt
- Tightening specification. Refer to → Brake System; Rep. Gr.46; Rear Brakes; Overview - Rear Brakes.
15 - Dust Cap
- Always replace if removed
- Removing and Installing. Refer to → Chapter "Wheel Bearing Unit, FWD, Removing and Installing".
- A perfect seal is only achieved using a new dust cap.
16 - Bolt
- 200 Nm + 180º
- Always replace if removed
- Clean the threads in the stub axle with a thread tap first.
17 - Wheel Hub with Wheel Bearing
- The wheel bearing and wheel hub are installed together in a housing.
- This wheel bearing/wheel bearing unit is maintenance and adjustment free. Adjusting or servicing is not possible!
- Removing and installing. Refer to → Chapter "Wheel Bearing Unit, FWD, Removing and Installing".
18 - Bolt
- Tightening specification. Refer to → Brake System; Rep. Gr.46; Rear Brakes; Overview - Rear Brakes.
19 - Brake Shield
20 - Bolt
- 90 Nm + 90º
- Always replace if removed
21 - Trailing Arm
- Removing and installing. Refer to → Chapter "Trailing Arm with Mounting Bracket, Removing and Installing, FWD Vehicles".
- Servicing. Refer to → Chapter "Trailing Arm, Servicing, FWD Vehicles".
22 - Bonded Rubber Bushing
- Replacing. Refer to → Chapter "Trailing Arm, Servicing, FWD Vehicles".
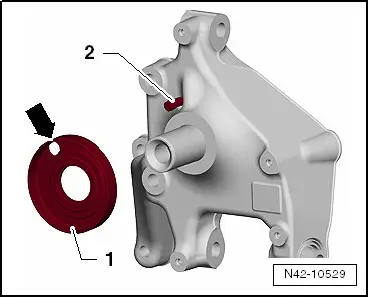
Wheel Bearing Seal Installation Position
 Note
Note
When installing the front wheel bearing seal -1-, make sure the hole -arrow- is installed at the center of the speed sensor -2-.
Overview - Wheel Bearing, Vehicles with AWD
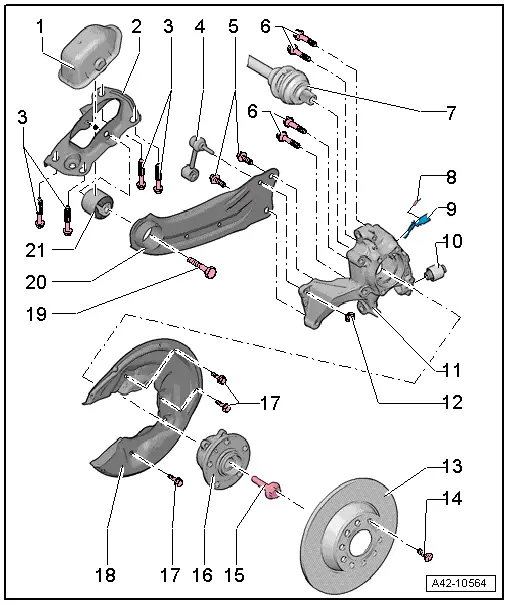
1 - Cover
2 - Bracket
3 - Bolt
- 50 Nm + 45º
- Always replace if removed
4 - Coupling Rod
5 - Bolt
- 90 Nm + 45º
- Always replace if removed
- Follow the tightening sequence. Refer to
6 - Bolt
- 70 Nm + 90º
- Always replace if removed
7 - Drive Axle
- Do not let the drive axle hang down. The inner joint could be damaged if it is bent too far.
8 - Bolt
- Tightening specification. Refer to → Brake System; Rep. Gr.45; Sensors; Overview - Rear Axle Speed Sensor.
9 - Left Rear ABS Wheel Speed Sensor -G46-
- Removing and installing. Refer to → Brake System; Rep. Gr.45; Sensors; Right/Left Rear ABS Wheel Speed Sensor G44/G46, Removing and Installing.
10 - Bonded Rubber Bushing
- Replacing. Refer to → Chapter "Wheel Bearing Housing Bonded Rubber Bushing, Replacing, AWD Vehicles".
11 - Wheel Bearing Housing
- Removing and installing. Refer to → Chapter "Wheel Bearing Housing, Removing and Installing, AWD Vehicles".
12 - Nut
- 40 Nm
- Always replace if removed
13 - Brake Rotor
14 - Bolt
- Tightening specification. Refer to → Brake System; Rep. Gr.46; Rear Brakes; Overview - Rear Brakes.
15 - Bolt
- 200 Nm + 180º
- Always replace if removed
- Loosening and tightening → Chapter "Drive Axle Threaded Connection, Loosening and Tightening"
- Before installing, clean the threads in the CV joint with a tap.
16 - Wheel Bearing Unit
- Removing and installing. Refer to → Chapter "Wheel Bearing Unit, AWD, Removing and Installing".
- The wheel bearing unit is maintenance free and has zero play. Adjusting or servicing is not possible!
17 - Bolt
- Tightening specification. Refer to → Brake System; Rep. Gr.46; Rear Brakes; Overview - Rear Brakes.
18 - Brake Shield
19 - Bolt
- 90 Nm + 90º
- Always replace if removed
20 - Trailing Arm
- Removing and installing. Refer to → Chapter "Trailing Arm with Mounting Bracket, Removing and Installing, AWD Vehicles".
21 - Bonded Rubber Bushing
- Replacing.
READ NEXT:
 Wheel Bearing Housing, Removing and Installing
Wheel Bearing Housing, Removing and Installing, FWD Vehicles
Special tools and workshop equipment
required
Torque Wrench 1332 40-200Nm -VAG1332-
Removing
- Measure dimension from cente
Wheel Bearing Unit, Removing and Installing
Wheel Bearing Unit, FWD, Removing and Installing
Special tools and workshop equipment
required
Puller - Grease Cap -VW637/2-
Camshaft Installer Kit - Sleeve -3241/4- from the Seal
Installer
Wheel Bearing Housing Bonded Rubber Bushing, Replacing
Wheel Bearing Housing Bonded Rubber Bushing, Replacing, FWD Vehicles
Special tools and workshop equipment
required
Bearing Installer - Control Arm -3346-
Bearing Installer - Carrier Bearing -
SEE MORE:
Radio Installation Instructions
Retrofitting Radio Systems
General Information
Before installing radios and telephone systems (radio
systems), disconnect the negative terminal of the Battery -A-.
Refer to
→Electrical Equipment; Rep. Gr.27.
Use the applicable wiring diagrams. Refer to
→ Wiring diagrams, Trou
Audi connect Infotainment services
Configuration
Applies to: vehicles with Audi connect Infotainment
Some Audi connect Infotainment services must
be configured through your personal myAudi account
at my.audi.com before using them for the first time.
Tips
A myAudi user must be logged in for some
Audi connect Infotainment services.
