
Audi Q3: Overview - Sunroof
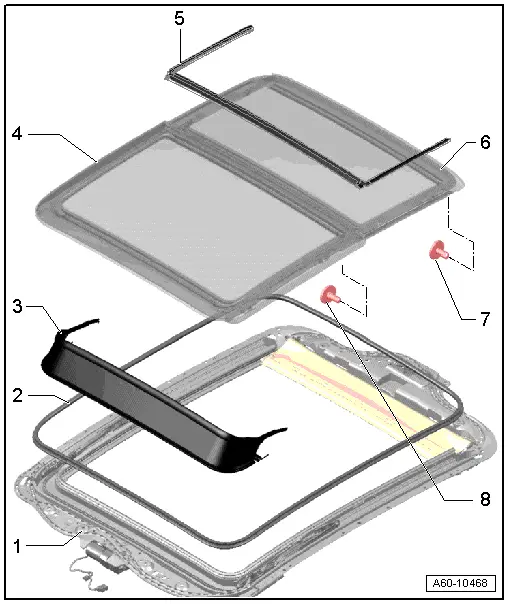
1 - Panorama Roof Frame
- Removing. Refer to → Chapter "Sunroof Frame, Removing and Installing".
2 - Seal
- Open the panel "1" completely and remove the seal.
- When installing, first position is on the front side, then push it to the rear under the panel "2" and press it all the way around onto the flange.
3 - Wind Deflector
- Removing. Refer to → Chapter "Wind Deflector, Removing and Installing".
4 - Panel "1"
- Removing. Refer to → Chapter "Panel 1 for the Panorama Roof, Removing".
5 - Panel Seal
- Removing. Refer to -item 3-.
6 - Panel "2"
- Removing. Refer to → Chapter "Panel 2 for the Panorama Roof, Removing".
7 - Bolt
- 3 Nm
8 - Bolt
- 7 Nm
Overview - Sunroof Shade
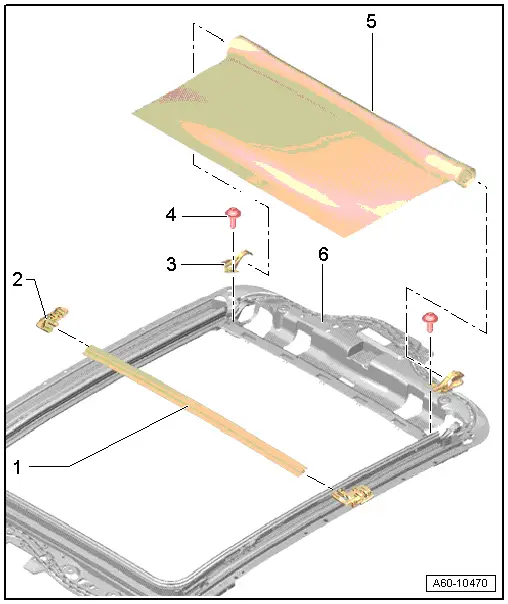
1 - Bow
2 - Sunroof Shade Cable Coupling Plate
- Can only be replaced with the cable.
- Removing, refer to → Chapter "Sunroof Shade Cable, Replacing"
3 - Cable Cover
4 - Bolt
- 1 Nm
5 - Sunroof Shade
- Removing, refer to
→ Chapter "Sunroof Shade, Removing and Installing"
- Remove the side rail from the material for the sunroof shade.
6 - Panorama Sunroof Frame
READ NEXT:
 Sunroof Frame, Removing and Installing
1 - Bolt
3 Nm
2 - Power Sunroof Control Module -J245-.
Performing the adaptation procedure. Refer to
→ Chapter "Motor Adaptation".
3 - Bolt
Glass Panel, Removing and Installing
Panel 1 for the Panorama Roof, Removing
Caution
Do not move or operate the already removed panel
otherwise it may become damaged.
Note
If the screws for the panel mounting wer
Sunroof Seals, Removing and Installing
Installing the Panel Seal
Note
Spray the seal with soapy solution to make the installation
easier.
- Align the seal in the center to the panel and push it into
the both front guidSEE MORE:
Dimming the mirrors
Manual dimming rearview mirror
Pull the lever on the bottom of the mirror back.
Automatic dimming rearview mirror
The interior and exterior mirrors dim automatically
when light shines on them, for example
from headlights on a vehicle behind you.
WARNING
Applies to: vehicles with automatic di
Headlamp Washer System
Overview - Headlamp Washer System
1 - Washer Fluid Hose
For the right spray nozzle
2 - Bolt
0.9 Nm
Quantity: 2
3 - Right Spray Nozzle
Removing and installing. Refer to
→ Chapter "Spray Nozzles, Removing and Installing".
The nozzles are
© 2019-2026 Copyright www.auq3.net | 0.0164
