Audi Q3: Overview - Microphone Unit
The Microphone Unit In Front Roof Module -R164- is installed in the Front Interior Lamp -W1-. Up to three microphones may be installed, depending on the equipment.
One microphone (Interior Microphone -R74-) is connected directly to the Digital Sound System Control Module -J525-. The other microphone (Telephone Microphone -R38-) is connected with the Information Electronics Control Module 1 -J794-.
The Microphone Unit In Front Roof Module -R164- located in the Front Interior Lamp -W1- can only be replaced as a complete unit. It is not possible to replace individual microphones (Interior Microphone -R74- or Telephone Microphone -R38-).
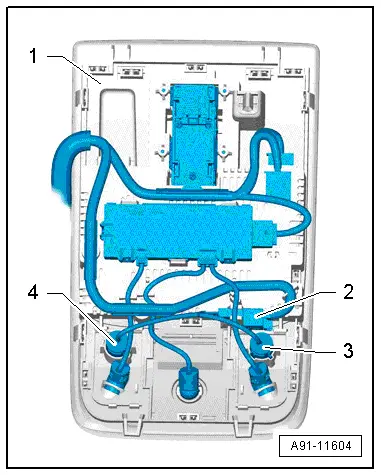
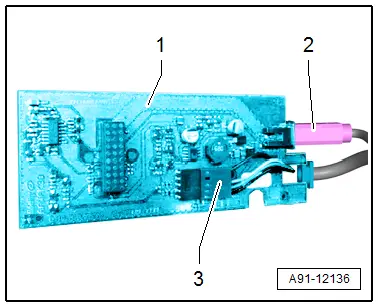
Microphone Unit in Front Roof Module -R164-
1 - Front Interior Lamp -W1-
2 - 4-Pin Connector -T4bg-
3 - Interior Microphone -R74-, Black to the Digital Sound System Control Module -J525-
4 - Telephone Microphone -R38-, gray to the Information Electronics Control Module 1 -J794-, MMI
Microphone Unit in Front Roof Module -R164-, removing and installing. Refer to → Chapter "Microphone Unit in Front Roof Module -R164-, Removing and Installing".

Microphone Unit in Front Roof Module -R164-, Removing and Installing
The Microphone Unit In Front Roof Module -R164- located in the Front Interior Lamp -W1- can only be replaced as a complete unit. It is not possible to replace individual microphones (Interior Microphone -R74- or Telephone Microphone -R38-).
Removing
- Turn off the ignition and all electrical equipment and remove the ignition key.
- Remove the Front Interior Lamp -W1-. Refer to → Electrical Equipment; Rep. Gr.96; Lamps; Roof Trim Panel Lamps Component Location Overview.
- Unclip and disconnect the connector -2- from the holder in the Front Interior Lamp -W1--1-.
- Pry the individual microphones -3 and 4- out of the housing for the Front Interior Lamp -W1--1-.
Installing
- Install in reverse order of removal.
Cellular Telephone Amplifier -R86-, Removing and Installing
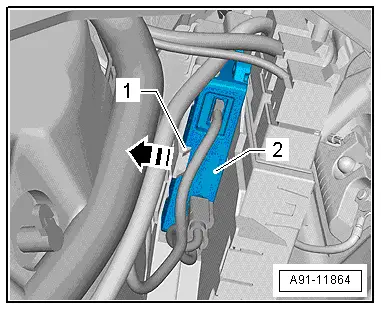
The Cellular Telephone Amplifier -R86--2- is behind the right luggage compartment trim panel.
The Cellular Telephone Amplifier -R86--2- is locked into place in the bracket -1-.
Removing
- Turn off the ignition and all electrical equipment and remove the ignition key.
- Remove the cover from the right side of the luggage compartment.

- Press the catch on the bracket -1- in direction of -arrow- and remove the Cellular Telephone Amplifier -R86--2- from the bracket.
- Release and disconnect all the connectors from the Cellular Telephone Amplifier -R86-.
Installing
- Install in reverse order of removal.
Telephone Baseplate -R126-, Removing and Installing
The Telephone Baseplate -R126- is composed of multiple components (cover, base plate, circuit board with sockets), that must be removed.
Removing
- Turn off the ignition and all electrical equipment and remove the ignition key.
- Fold the Telephone Baseplate -R126- center console storage compartment upward.
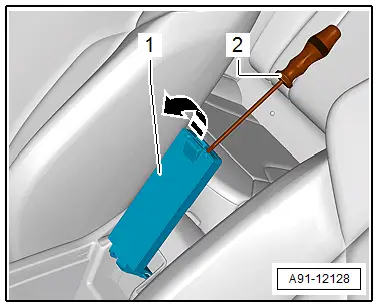
- Unclip the bottom of the cover -1- with a small screwdriver -2--arrow-.
- Remove the bolts -arrows- from the Telephone Baseplate -R126--2- and remove the base plate -1-.
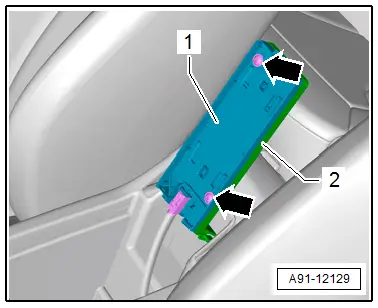
- Remove the bolts -arrows- from the Telephone Baseplate -R126--2- and remove the circuit board -1-.

- Release and disconnect the connectors -2 and 3- from the circuit board -1-.
Installing
- Install in reverse order of removal.
READ NEXT:
 Connector Assignments, Cell Phone Preparation Concert MOST, 9ZF
Information Electronics Control Module 1 -J794-
1 - Connector AM/FM1 from the Antenna Amplifier -R24- (Radio
Antenna 2 -R93-)
2 - DAB connection from Antenna Amplifier 4 -R113-
Connector Assignments, Cell Phone Preparation MMI, 9ZF
Information Electronics Control Module 1 -J794-
1 - Not Assigned
2 - 4-Pin Connector -T4u- to the External Audio Source
Connection -R199-/Internet Access Control Mo
Connector Assignment, Bluetooth Hands-Free Calling Concert MOST, 9ZX
Information Electronics Control Module 1 -J794-
1 - Connector AM/FM1 from the Antenna Amplifier -R24- (Radio
Antenna 2 -R93-)
2 - DAB connection from Antenna Amplifier 4 -R113-SEE MORE:
Side Air Intake Trim, Removing and Installing, Audi RS Q3 through MY 2014
Removing
- Left: remove the front bumper cover. Refer to
→ Chapter "Bumper Cover, Removing and Installing".
- Right: remove the front wheel housing liner and wheel
spoiler. Refer to
→ Chapter "Front Wheel Housing Liner, Removing and Installing".
- Carefully remov
Name Badges and Emblems
Overview - Name Badges and Emblems
Overview - Name Badges and Emblems, Vehicles through MY 2014
1 - Audi Rings
Removing and installing. Refer to
→ Chapter "Front Emblem, Removing and Installing".
2 - RS Q3-name badge
Equipment level
Removing and installi