Audi Q3: Overview - Cover and Cushion
Overview - Cover and Cushion, Sport Bench Seat
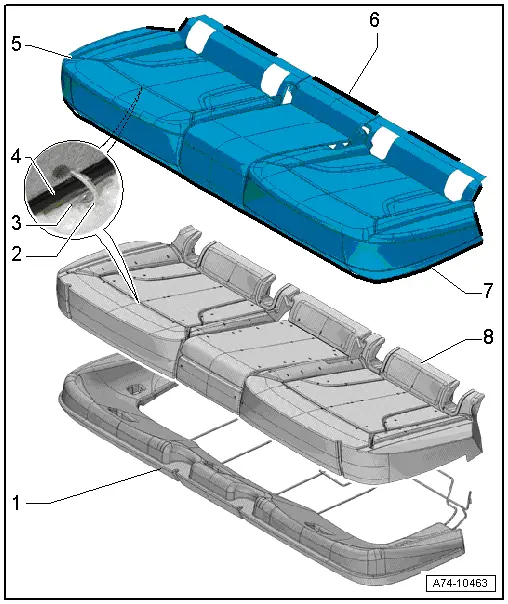
1 - Seat Frame
- With the molded piece
2 - Upholstery Clip
- For attachment of seat cover to seat cushion
- Replace
- Install at the same location with Upholstery Clip Pliers -VAG1634-.
3 - Wire
- Embedded in the foam of the seat cushion
- For attachment of seat cover to seat cushion
4 - Contour Strip
- Sewn into seat cover
- For attachment of seat cover to seat cushion
5 - Seat Cover
- Seat cover and cushion, removing and installing. Refer to → Chapter "Cover and Cushion, Removing and Installing, Bench Seat".
- Seat cover and cushion, removing and installing. Refer to → Chapter "Cover and Cushion, Separating, Bench Seat".
- Allocation. Refer to the Parts Catalog.
- Make sure there are no folds after installing
6 - Molding
- Sewn into seat cover
- For engaging the seat cover in the seat frame
- Make sure is fits correctly on the seat frame
7 - Clamping Strip
- Sewn into seat cover
- For attaching the seat cover to the seat frame
- Strip inward 180º and engage in the groove in the molded piece.
8 - Seat Cushion
- Seat cover and cushion, removing and installing. Refer to → Chapter "Cover and Cushion, Removing and Installing, Bench Seat".
- Seat cover and cushion, removing and installing. Refer to → Chapter "Cover and Cushion, Separating, Bench Seat".
- Allocation. Refer to the Parts Catalog.
Overview - Cover and Cushion, Backrest without a Pass-Through
 Note
Note
A right 2/3 rear seat backrest is shown in the assembly overview. The left 1/3 rear seat backrest is identical.
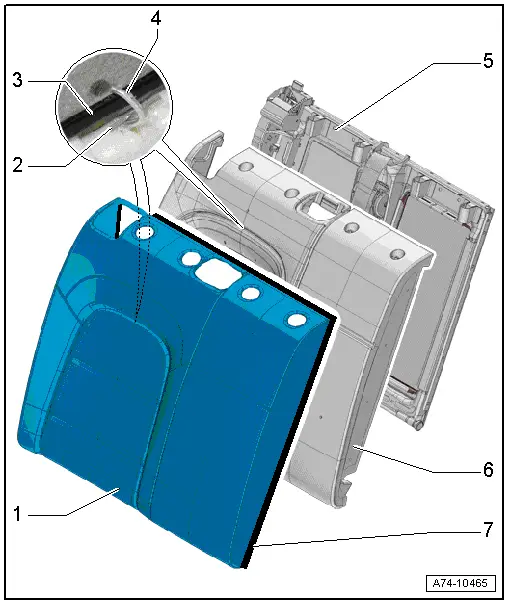
1 - Backrest Cover
- Backrest cover and cushion, removing and installing. Refer to → Chapter "Cover and Cushion, Removing and Installing, Backrest".
- Backrest cover and cushion, separating and assembling. Refer to → Chapter "Cover and Cushion, Separating, Backrest".
- Allocation. Refer to the Parts Catalog.
- Make sure there are no folds after installing
2 - Wire
- Embedded in the foam of the backrest cushion
- For attachment of backrest cover to backrest cushion
3 - Contour Strip
- Sewn into backrest cover
- For attachment of backrest cover to backrest cushion
4 - Upholstery Clip
- For attachment of backrest cover to backrest cushion
- Replace
- Install at the same location with Upholstery Clip Pliers -VAG1634-.
5 - Backrest Frame
- Removing and installing. Refer to → Chapter "Cover and Cushion, Removing and Installing, Backrest".
6 - Backrest Cushion
- Backrest cover and cushion, removing and installing. Refer to → Chapter "Cover and Cushion, Removing and Installing, Backrest".
- Backrest cover and cushion, separating and assembling. Refer to → Chapter "Cover and Cushion, Separating, Backrest".
- Allocation. Refer to the Parts Catalog.
7 - Clamping Strip
- Sewn into backrest cover
- For attaching the backrest cover on the backrest frame
Overview - Cover and Cushion, Backrest with a Pass-Through
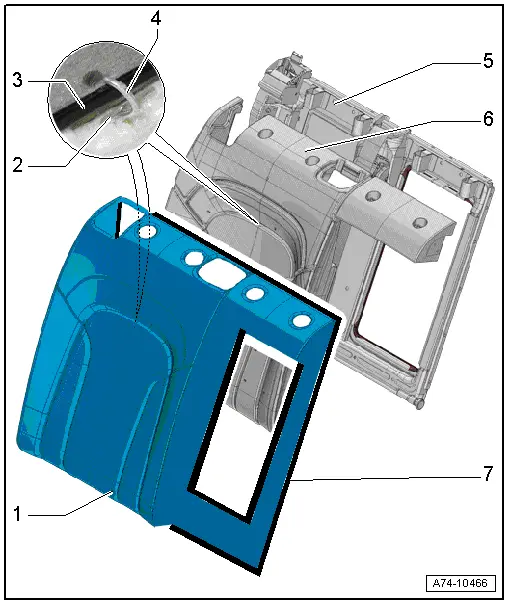
1 - Backrest Cover
- Backrest cover and cushion, removing and installing. Refer to → Chapter "Cover and Cushion, Removing and Installing, Backrest".
- Backrest cover and cushion, separating and assembling. Refer to → Chapter "Cover and Cushion, Separating, Backrest".
- Allocation. Refer to the Parts Catalog.
- Make sure there are no folds after installing
2 - Wire
- Embedded in the foam of the backrest cushion
- For attachment of backrest cover to backrest cushion
3 - Contour Strip
- Sewn into backrest cover
- For attachment of backrest cover to backrest cushion
4 - Upholstery Clip
- For attachment of backrest cover to backrest cushion
- Replace
- Install at the same location with Upholstery Clip Pliers -VAG1634-.
5 - Backrest Frame
- Removing and installing. Refer to → Chapter "Cover and Cushion, Removing and Installing, Backrest".
6 - Backrest Cushion
- Backrest cover and cushion, removing and installing. Refer to → Chapter "Cover and Cushion, Removing and Installing, Backrest".
- Backrest cover and cushion, separating and assembling. Refer to → Chapter "Cover and Cushion, Separating, Backrest".
- Allocation. Refer to the Parts Catalog.
7 - Clamping Strip
- Sewn into backrest cover
- For attaching the backrest cover on the backrest frame
READ NEXT:
 Cover and Cushion, Removing and Installing
Cover and Cushion, Removing and Installing, Bench Seat
Removing
- Remove the rear bench seat. Refer to
→ Chapter "Bench Seat/Single Seat, Removing and Installing".
- Pry up the s
Cover and Cushion, Separating
Cover and Cushion, Separating, Bench Seat
Special tools and workshop equipment
required
Upholstery Clip Pliers -VAG1634-
Removing
- Remove the rear bench seat. Refer to
→ ChapSEE MORE:
Engine compartment
General information
Special care is required if you are working in the
engine compartment
For work in the engine compartment, such as
checking and filling fluids, there is a risk of injury,
scalding, accidents, and burns. For this
reason, follow all the warnings and general
safety precautions provid
Brake Master Cylinder, Removing and Installing
Special tools and workshop equipment
required
Brake Charger/Bleeder Unit -VAS5234-
Sealing plugs from Repair Kit -1H0 698 311 A-
Removing
- Remove the brake fluid reservoir, refer to
→ Chapter "Brake Fluid Reservoir, Removing and Installing".
- Disconnect the
© 2019-2026 Copyright www.auq3.net | 0.0098
