Audi Q3: Hinges, Removing and Installing
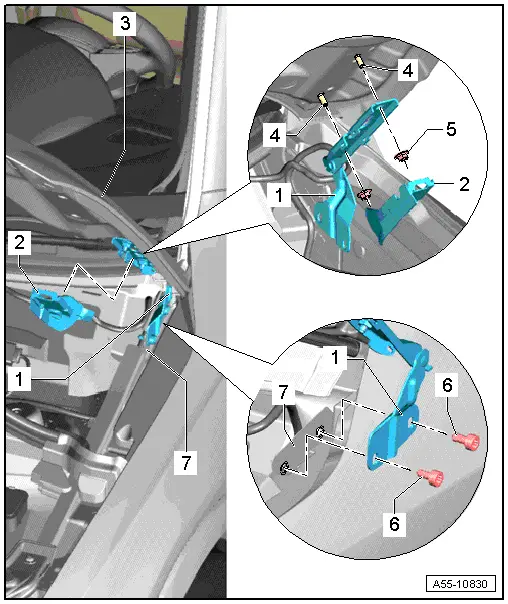
1 - Hood Hinge
- Removing
- Before removing a hood hinge, support the hood or secure it against falling.
- Remove the gas-filled strut. Refer to → Chapter "Gas-Filled Strut, Removing and Installing".
- Unclip and remove the cover from the lid hinges.
- Remove the bolts -6- and nuts -5-.
- Installing
- Align with the markings -arrows- in reverse order.
2 - Cover
3 - Hood
4 - Threaded Pins
5 - Nut
- 25 Nm
6 - Bolt
- 21 Nm
7 - Fender Flange
Insulation, Removing and Installing
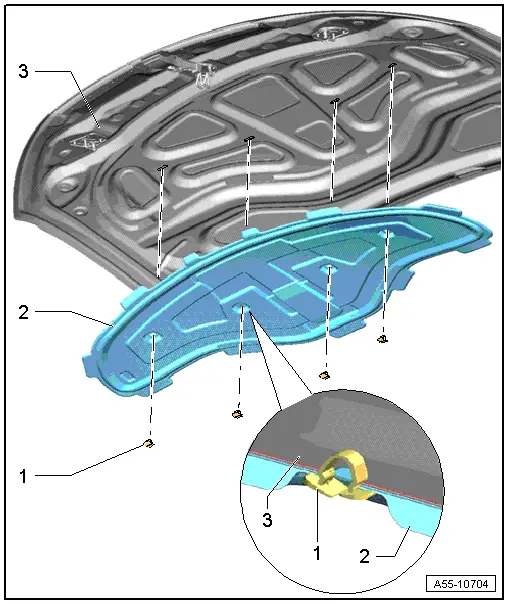
1 - Clip
2 - Insulation
- Installation:
- Slide the insulation over the tabs on the rear edge into the holes provided on the inner panel.
- Slide the tabs on the front edge and the sides into place.
- The clips must engage audibly when pressing in.
3 - Hood
Gas-Filled Strut, Removing and Installing
Removing
- Support the lid or secure it against falling.
- Using a small screwdriver, lift the securing spring -arrow- slightly and remove the gas-filled strut -1- from the upper ball stud -2-.
- Repeat procedure on lower ball stud.
Installing
 Note
Note
After complete removal of the gas-filled strut ensure correct positioning during installation: the gas-filled strut tube must be attached on the lid side.
- Press gas-filled strut onto ball stud and engage.

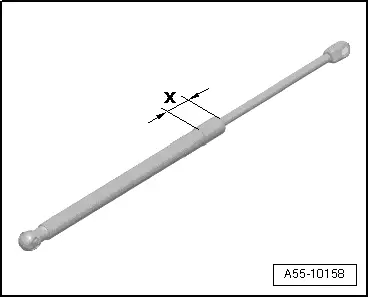
Gas-Filled Strut, Releasing Gas
- Clamp gas-filled strut in a vise in area -x- = 50 mm.
 WARNING
- Clamp only within this area, otherwise accidents could occur!
- Wear protective eyewear when sawing.
 Note
Note
Cover area of sawn portion with a rag to absorb oil spraying out.
- Cut through the gas-filled strut cylinder within the first third of the overall cylinder length using the piston rod end of the cylinder as a reference point.
READ NEXT:
 Overview - Rear Lid
Overview - Rear Lid
1 - Rear Lid
Removing and installing. Refer to
→ Chapter "Rear Lid, Removing and Installing".
Rear Lid Seal, Removing and Installing. Refer to
→&nbs
Rear Lid, Removing and Installing
Rear Lid, Removing and Installing
A second technician will be needed during removal and
installation to support and to hold the rear lid.
Removing:
Note
Mark the position of the re
Actuator, Removing and Installing
Rear Lid Motor 1 and 2 -V444-/-V445-, Removing and Installing
WARNING
After removing and installing, the Rear Lid Motor 1
- V444- or Rear Lid Motor 2 -V445- must be adapted via
Guided SEE MORE:
Overview - Hood
Overview - Hood
1 - Hood
A second technician is needed to support and hold the hood during
removal and installation.
Removing:
Unclip and remove the cover -4-.
Engage the gas-filled strut on the hood. Refer to
→ Chapter "Gas-Filled Strut, Removing and Installin
CV Joint, Servicing, Drive Axle with Triple Roller Joint AAR3300i, Mounted
in Transmission
Special tools and workshop equipment
required
Tripod Joint Tool -T10065-
Puller - Driveshaft -T10382-
Hose Clip Pliers -VAG1275A-
Torque Wrench 1331 5-50Nm -VAG1331-
Torque Wrench 1332 40-200Nm -VAG1332-
Clamping Pliers -VAG1682A-
Press Plate -VW401-
Press Plate -VW402-
Press P