Audi Q3: Overview - Electric Vacuum Pump
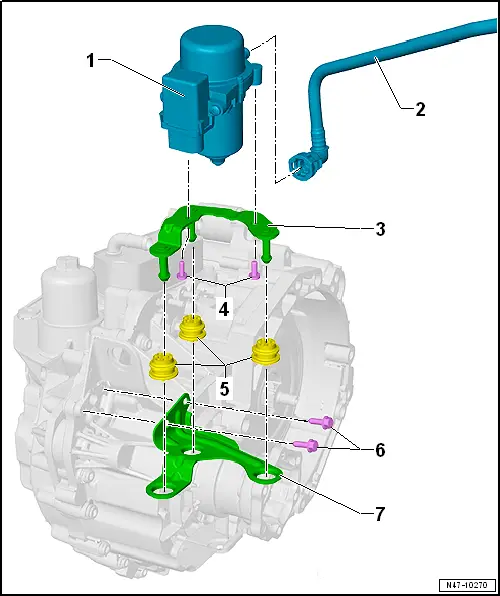
1 - Brake System Vacuum Pump -V192-
- Allocation, refer to the Parts Catalog.
- Installed location: in the engine compartment over the engine transmission separating point.
- Do not disassemble
- Removing and installing, refer to → Chapter "Electric Vacuum Pump, Removing and Installing".
2 - Vacuum Line
- With brake booster pressure sensor
- Allocation, refer to the Parts Catalog.
3 - Bracket
4 - Bolt
- 8 Nm
- Quantity: 2
5 - Rubber Insulation
- Quantity: 3
- Do not press out of bracket when installing
6 - Bolt
- 25 Nm
7 - Bracket
- Secured on the transmission
Overview - Vacuum Pump
Overview - Vacuum Pump, Vehicles with 2.0L TFSI Engine
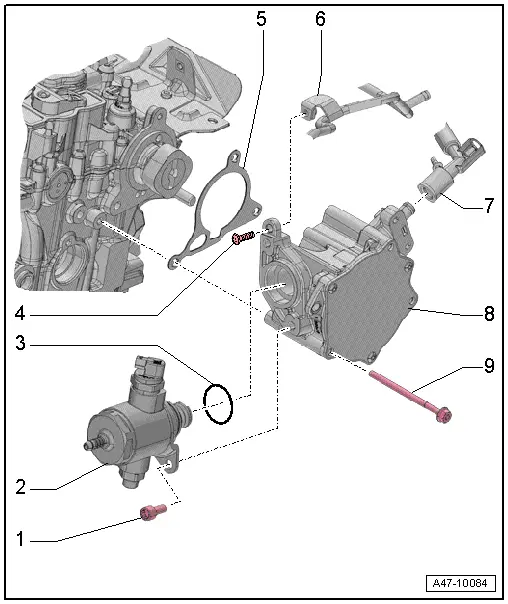
1 - Bolt
- Tightening specification, refer to → Engine Mechanical, Fuel Injection and Ignition; Rep. Gr.24; High Pressure Pump; Overview - High Pressure Pump.
2 - High Pressure Pump
- Removing and installing, refer to → Rep. Gr.24; High Pressure Pump; High Pressure Pump, Removing and Installing.
3 - O-Ring
4 - Bolt
- 9 Nm
5 - Seal
- Replacing
6 - Coolant Line
7 - Vacuum Hose
- With Vacuum Sensor -G608-
- Replace vacuum hose if damaged
- Vacuum Sensor -G608-, removing and installing, refer to → Chapter "Vacuum Sensor -G608-, Removing and Installing".
8 - Vacuum Pump
- The vacuum pump is mechanically driven.
- Vacuum system, checking, refer to → Chapter "Vacuum System, Checking".
- Removing and installing, refer to → Chapter "Vacuum Pump, Removing and Installing, Vehicles with 2.0L TFSI Engine".
9 - Bolt
- 9 Nm
Overview - Vacuum Pump, Vehicles with TDI Engine
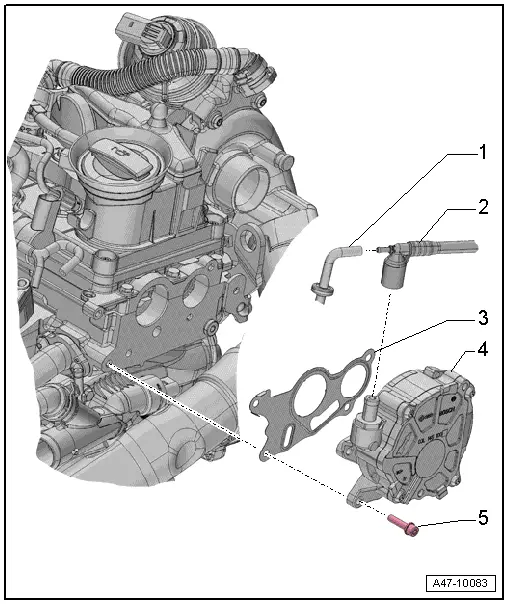
1 - Vacuum Hose
- Replace if damaged
2 - Vacuum Line
- Replace if damaged
3 - Seal
- Replacing
4 - Vacuum Pump
- The vacuum pump is mechanically driven.
- Vacuum System, Checking, refer to → Chapter "Vacuum System, Checking".
- Removing and installing, refer to → Chapter "Vacuum Pump, Removing and Installing, Vehicles with TDI Engine".
5 - Bolt
- 9 Nm
READ NEXT:
 Check Valve, Checking
Check valve is removed, refer to
→ Chapter "Check Valve, Removing and Installing".
Note
The check valve is installed directly in front of the vacuum
pump.
Valve must all
Vacuum Sensor -G608-, Removing and Installing
Removing
Audi Q3:
- Open the clamps -arrows- and
remove the air guide pipe -1-.
- Disconnect the connector -2-.
- Remove the vacuum hose -3-.
Audi RS Q3:
- Loosen the h
Vacuum Pump, Removing and Installing
Vacuum Pump, Removing and Installing, Vehicles with 2.0L TFSI Engine
Removing
- Remove the engine cover, refer to
→ Rep. Gr.10; Engine Cover; Engine Cover, Removing and
InstalliSEE MORE:
Suspension
Adaptive dampers
Applies to: vehicles with suspension control
The adaptive dampers are an electronically-controlled
damping system. The firmness of the suspension
will adapt to the driving conditions and
the driving situation. The settings depend on the
selected Audi drive select mode.
Ground cleara
Smartphone interface
Setup
Applies to: vehicles with smartphone interface
You can connect your smartphone to the MMI
with a cable or wirelessly using the smartphone
interface. Certain content on your smartphone is
adapted in the MMI while driving and can be operated
through the MMI.
Connecting smartphones with a cable
R
© 2019-2026 Copyright www.auq3.net | 0.0089
