Audi Q3: High-Mounted Brake Lamp
Overview - High-Mounted Brake Lamp
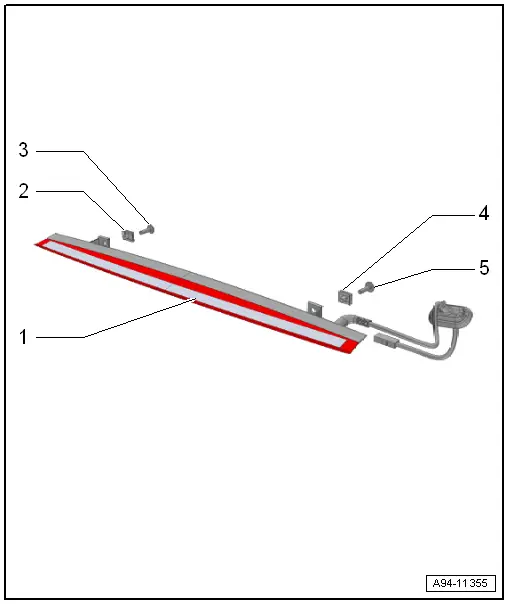
1 - High-Mounted Brake Lamp
- High-Mounted Brake Lamp Bulb -M25-
- Removing and installing. Refer to → Chapter "High-Mounted Brake Lamp Bulb, Removing and Installing".
2 - Spring Nut
3 - Bolt
- 2.5 Nm
4 - Spring Nut
5 - Bolt
- 2.5 Nm
High-Mounted Brake Lamp Bulb, Removing and Installing
Removing
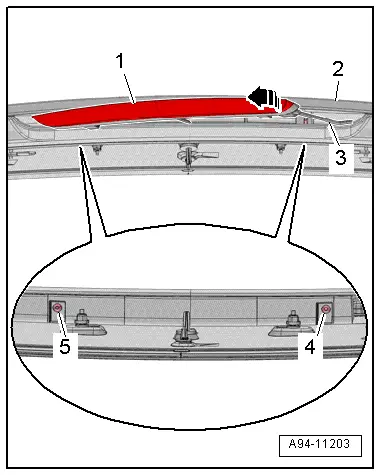
- Remove the roof spoiler. Refer to → Body Exterior; Rep. Gr.66; Spoiler; Spoiler, Removing and Installing.
- Remove the bolts -4 and 5-.
- Pivot the high-mounted brake lamp -1- on the right side out of the roof spoiler -2- in direction of -arrow- and guide out the wiring harness -3-.
Installing
Install in reverse order of removal. Note the following:
- Install the roof spoiler. Refer to → Body Exterior; Rep. Gr.66; Spoiler; Spoiler, Removing and Installing.
License Plate Lamp
Left/Right License Plate Lamp -X4-/-X5-, Removing and Installing
Removing
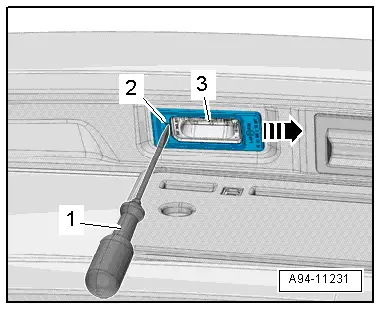
- Turn the light switch to position "0".
- Remove the license plate lamp -3- from the rear lid by positioning a screwdriver -1- at the slit -2- and sliding it in the direction of -arrow-.
Installing
Install in reverse order of removal. Note the following:
 Note
Note
The entire license plate lamp must be replaced if an LED is faulty.
- Insert the license plate lamp into opening and engage on opposite side.
READ NEXT:
 Component Location Overview - Access/Start Authorization System
1 - Electronic Steering Column Lock Control Module -J764-
Overview. Refer to
→ Chapter "Overview - Steering Column Switch Module, with Electronic
Ignition Switch".
2
Front Exterior Door Handle Switch, Removing and Installing
Removing
- Remove the exterior door handle. Refer to
→ Body Exterior; Rep. Gr.57; Door Components; Door Handle,
Removing and Installing.
Note
Ignore -1 and 2-.
-&
Overview - Steering Column Switch Module
Steering Column Switch Module Assembly Overview, with Mechanical Ignition
Switch
1 - Steering Column
2 - Bolt
Quantity: 2
For steering lock housing (shear bolt)
3&nbSEE MORE:
Folding the outer backrests
Applies to: vehicles with folding backrests
Fig.72 Rear bench seat: loop
The rear seat backrests can be folded forward either
separately or together.
Observe the safety precautions.
If necessary, slide the rear bench seat back.
To fold the backrest forward, pull the strap 1
in the direction of
Roof Bars/Roof Rails
Overview - Roof Railing
1 - Nut
Quantity: 4
Install with locking compound. For the correct locking compound,
refer to the Parts Catalog.
Tightening sequence. Refer to
→ Fig. "Roof Rail - Tightening Specification and Sequence"
2 - Balancing Element
Quan