
Audi Q3: Ground Cable with Battery Monitoring Control Module -J367-, Removing and Installing
Ground Cable with Battery Monitoring Control Module -J367-, Removing and Installing, Engine Compartment Battery Version 1
Removing
- Turn off the ignition.
- Vehicles with ignition lock: Remove the key.
- Push the release button -1- and pivot the battery cover -2- upwards at the same time the guides on the battery trim panel mount -3 and 4- disengage at the rear.
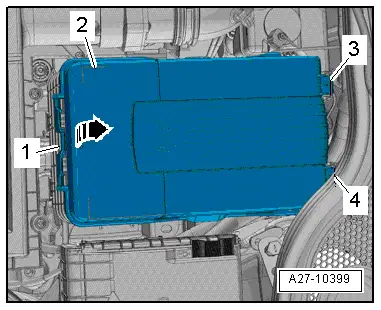
- If equipped open the heat shield cover.
- If equipped, remove the cover over the battery negative terminal.
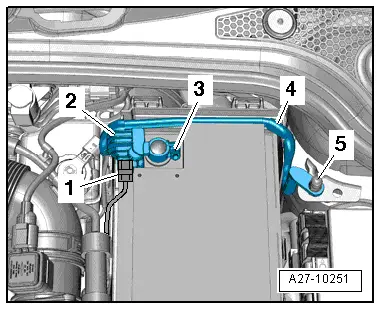
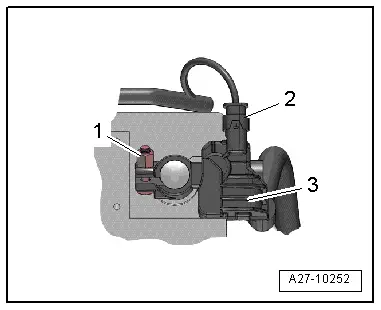
- Loosen the nut several turns and remove the battery ground cable terminal -3- from the battery terminal.
- Disconnect the connector -1-.
- Remove the nut -5- and ground cable -4- with the Battery Monitoring Control Module -J367--2-.
Installing
Install in reverse order of removal. Note the following:
- Connect the battery.
Ground Cable with Battery Monitoring Control Module -J367-, Removing and Installing, Engine Compartment Battery Version 2
Removing
- Turn off the ignition.
- Vehicles with ignition lock: Remove the key.
- Remove the air filter housing. Refer to → Rep. Gr.23; Air Filter; Air Filter Housing, Removing and Installing or → Rep. Gr.24; Air Filter; Air Filter Housing, Removing and Installing.
- Push the release button -1- and pivot the battery cover -2- upwards at the same time the guides on the battery trim panel mount -3 and 4- disengage at the rear.
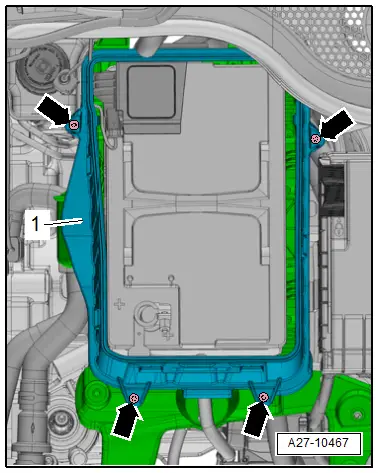
- Remove the bolts -arrows-.
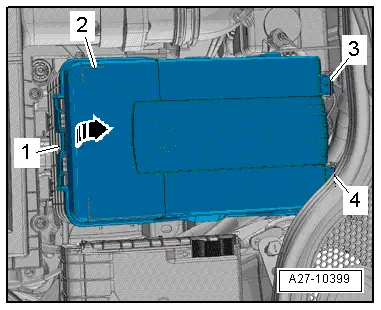
- Remove the front battery trim panel -1- upward.
- Remove the cover -4- over the battery negative terminal.
- Loosen the nut several turns and remove the battery ground cable terminal -3- from the battery terminal.
- Disconnect the connector -1-.
- Remove the nut -6- and ground cable -5- with the Battery Monitoring Control Module -J367--2-.
Installing
Install in reverse order of removal. Note the following:
- Connect the battery.
Ground Cable with Battery Monitoring Control Module - J367-, Removing and Installing, Battery in the Luggage Compartment
Removing
- Turn off the ignition.
- Vehicles with ignition lock: Remove the key.
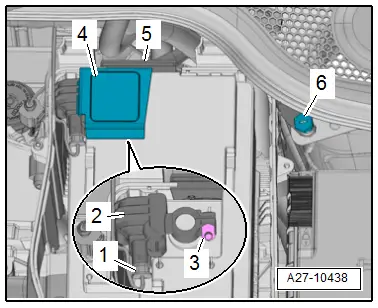
- Remove the luggage compartment floor panel cover.
- On vehicles with a subwoofer disconnect the connector -4-, remove the bolt -2- and remove the subwoofer -3-.
- Remove the molded insert -1-.
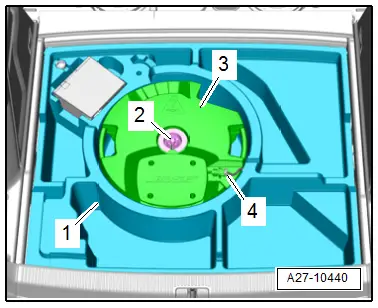
- Remove the bolts -arrows-.
- If equipped, free up the wiring harness -3-.
- Remove the battery cover -1-.
- Remove the heat shield -2- from the battery.
- Remove the cover -7- over the battery negative terminal.
- Loosen the nut several turns and remove the battery ground cable terminal -1- from the battery terminal.
- Disconnect the connector -2-.
- Remove the nut -4- and ground cable -5- from the threaded pins.
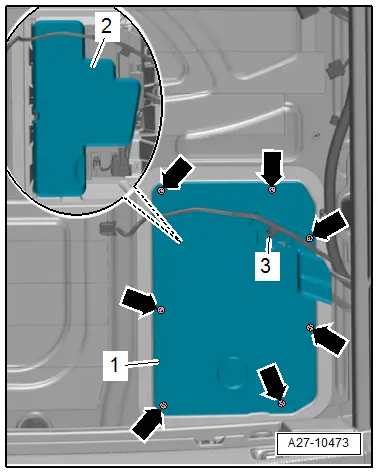
- Remove the ground cable -6- with the Battery Monitoring Control Module - J367--3-.
Installing
Install in reverse order of removal. Note the following:
 Note
Note
Before connecting the connector on the Battery Monitoring Control Module -J367- wait 30 seconds.
- Connect the battery ground cable terminal to the battery negative pole "-" by hand and tighten the nut -1-.
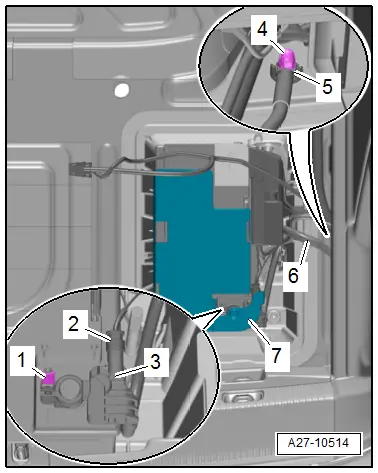
- Wait 30 seconds and then connect the connector -2- to the Battery Monitoring Control Module -J367--3-.
When the battery is connected, the following steps must be performed:
- Activate the one-touch up/one-touch down power window regulators. Refer to the Owner's Manual.
- Check DTC memories of all control modules and erase "Undervoltage" DTC if necessary. Refer to Vehicle Diagnostic Tester.
 Note
Note
After connecting the power supply, the ABS warning lamp may only go out after the vehicle has been driven a few yards.
READ NEXT:
 Battery, Removing and Installing
Battery in Engine Compartment, Removing and Installing, Version 1
Note
If the battery is to be replaced, connect the battery
charger for battery support mode. Refer to
→ Electric
Battery in Luggage Compartment, Removing and Installing
Note
If the battery is to be replaced, connect the battery
charger for battery support mode. Refer to
→ Electrical Equipment General Information; Rep. Gr.27; Battery,
Battery Tray, Removing and Installing
Battery Tray, Removing and Installing, Version 1
Removing
- Remove the air filter housing. Refer to
→ Rep. Gr.23; Air Filter; Air Filter Housing, Removing and
Installing or
â†SEE MORE:
Memory function
General information
With the memory function, you can save and call
up seat profiles using the memory buttons in the
door trim panel.
Depending on vehicle equipment, some settings
such as the driver's seat and exterior mirror position
can be stored.
Storing and recalling a seat profile
The memory fu
Door Lock, Removing and Installing
Door Lock, Removing and Installing
Caution
There is a risk of malfunctions.
The door lock must be removed and installed together
with the bracket to prevent over-bending the cable when
disengaging and engaging it.
The cable must be disconnected from/attached to the
lever on the d