Audi Q3: Glove Compartment Handle, Removing and Installing
Special tools and workshop equipment required
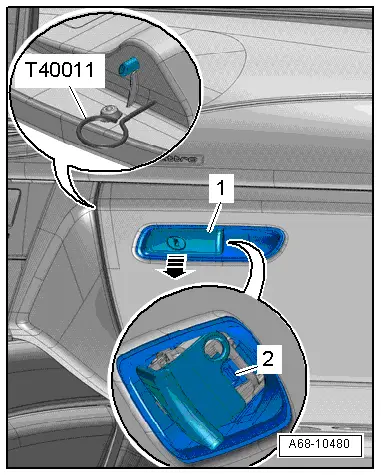
- Locking Pin (3 pc.) -T40011-
Removing
 Note
Note
If glove compartment cover does not open, it can be opened via the emergency release. Refer to → Chapter "Glove Compartment Lid Emergency Release, Operating".
- Press the glove compartment handle -1- and release retaining the hook -2- at the side of the glove compartment opener using a screwdriver.
- Insert the Locking Pin -T40011- through an opening on the side of the glove compartment lid and release the hook in the glove compartment handle.
- Remove the glove compartment opener from the glove compartment cover -arrow-.
Installing
Install in reverse order of removal.
Installation notes, for example tightening specifications, replacing components. Refer to → Chapter "Overview - Glove Compartment".
Glove Compartment, Removing and Installing
Glove Compartment Lid Emergency Release, Operating
Procedure
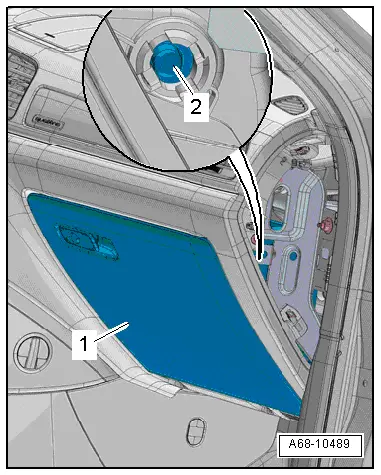
- Remove the side cover from the instrument panel on the passenger side. Refer to → Chapter "Instrument Panel Side Cover, Removing and Installing".
- Using a screwdriver (or a screwdriver tool) open the glove compartment lid -1- by pushing down the locking ring -2-.
Glove Compartment, Removing and Installing
Removing
 Note
Note
If glove compartment cover does not open, it can be opened via the emergency release. Refer to → Chapter "Glove Compartment Lid Emergency Release, Operating".
- Disconnect the battery ground cable with the ignition turned on. Refer to → Electrical Equipment; Rep. Gr.27; Battery; Battery, Disconnecting and Connecting.
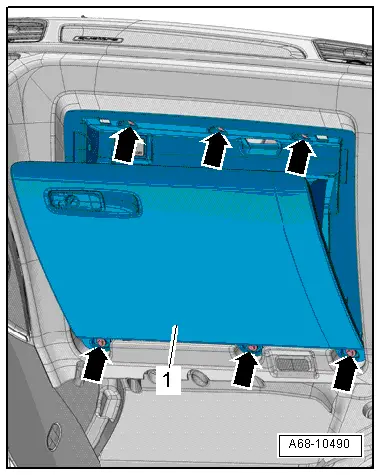
- Open the glove compartment cover and remove the screws -arrows-.
 WARNING
Before handling pyrotechnic components (for example, disconnecting the connector), the person handling it must "discharge static electricity". This can be done by touching the door striker, for example.
- Remove glove compartment -1- just far enough until it is possible to disconnect the connector from the central connector.
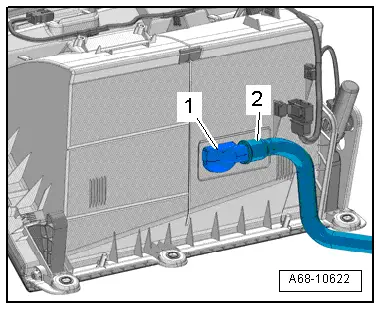
- Versions with glove compartment cooling: remove the air hose -2- from the vent -1-.
- Equipment levels with card reader: disconnect the connector.
- Equipment levels with Headlamp Range Control Module -J431-: disconnect the connector.
Installing
 WARNING
- Before handling pyrotechnic components (for example, connecting the connector), the person handling it must "discharge static electricity". This can be done by touching the door striker, for example.
- Make sure the connectors are installed correctly and are secure.
Install in reverse order of removal. Note the following:
- Press the electrical connector together until it engages audibly.
 WARNING
Ignition must be on when connecting battery. If pyrotechnic components (for example, airbag, belt tensioner) are not repaired correctly, they may deploy unintentionally after connecting battery. There must not be anyone inside the vehicle when connecting the battery.
- Connect the battery ground cable with the ignition turned on. Refer to → Electrical Equipment; Rep. Gr.27; Battery; Battery, Disconnecting and Connecting.
 Note
Note
If the Airbag Indicator Lamp -K75- indicates a fault, check the DTC memory, erase it and check it again using the Vehicle Diagnostic Tester → Vehicle diagnostic tester.
Installation notes, for example tightening specifications, replacing components. Refer to → Chapter "Overview - Glove Compartment".
Glove Compartment Lid, Removing and Installing
Removing
- Remove the glove compartment. Refer to → Chapter "Glove Compartment, Removing and Installing".
- Place the glove compartment on a soft surface.
- Remove the hinge pin -1- from the lid dampening mechanism.
- Drive out the left and right hinge pins -2- for the glove compartment lid with a punch in the direction of the -arrow-.
- Remove the glove compartment lid from the glove compartment.
Installing
Install in reverse order of removal.
Installation notes, for example tightening specifications, replacing components. Refer to → Chapter "Overview - Glove Compartment".

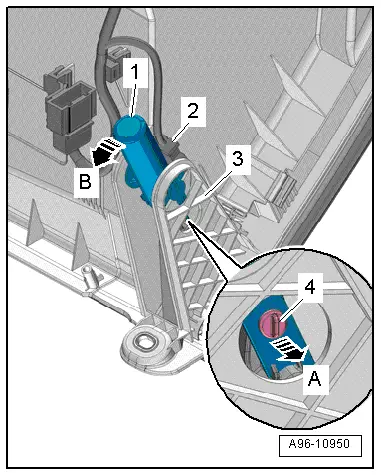
Glove Compartment Lid Dampening Mechanism, Removing and Installing
Removing
- Remove the glove compartment. Refer to → Chapter "Glove Compartment, Removing and Installing".
- Disconnect the connector -2-.
- Remove the hinge pin -4--arrow A-.
- Release the switch -1- counter-clockwise -arrow B-.
- Remove the switch by pushing the outer mount -3- slightly to the side.
Installing
Install in reverse order of removal.
Installation notes, for example tightening specifications, replacing components. Refer to → Chapter "Overview - Glove Compartment".
READ NEXT:
 Equipment
Overview - Sun Visors
1 - Sun Visor
Allocation. Refer to the Parts Catalog.
Removing and installing. Refer to
→ Chapter "Sun Visor, Removing and Installing".
Insert visor
Overview - Center Console
Overview - Center Console, Basic Equipment Level
1 - Storage Compartment
Vehicles with:
With External Audio Source Connection -R199-
Removing and installing. Refer to
→&nbs
Center Console Rear Trim, Removing and Installing
Special tools and workshop equipment
required
Wedge Set -T10383-
Removing
- Move the front seats all the way forward.
Vehicles with a Center Armrest:
- Vehicles with vents: removSEE MORE:
Overview - A-Pillar Trim Panel
1 - Lower Clamp
Without hooks
Replace damaged or deformed clips
Insert in the trim panel
Remove any remaining clips in the body mounting points using the
Omega Clip Tool -T40280-. To install, insert into the trim panel.
2 - Center Clamp
with hooks
Replace
Overview - Navigation System
Overview - Navigation System, General Information
The navigation system is available on vehicles with
Ready4Nav (7Q4), Navigation packet (7T2) and MMI navigation plus
(7T6).
The navigation system is part of the Information Electronics
Control Module 1 -J794- inside the instrument panel.
