Audi Q3: Center Console Rear Trim, Removing and Installing
Special tools and workshop equipment required
- Wedge Set -T10383-
Removing
- Move the front seats all the way forward.
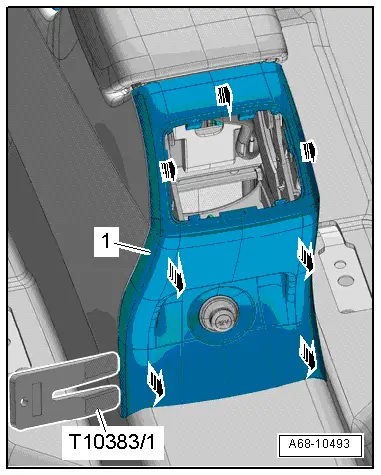
Vehicles with a Center Armrest:
- Vehicles with vents: remove the rear vent. Refer to → Chapter "Rear Vents, Removing and Installing".
- Equipment level with storage compartment: remove the rear storage compartment. Refer to → Chapter "Center Console Rear Storage Compartment, Removing and Installing".
- Unclip the cover -1- at the sides and above using the wedge -T10383/1--arrows-.
- Remove the cover toward the rear from the center console.
- Disconnect the connectors.
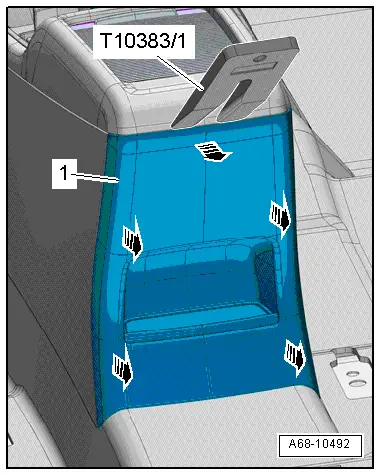
Vehicles without a Center Armrest:
- Unclip the cover -1- above and at the sides carefully with the Wedge -T10383/1--arrows-.
- Remove the cover toward the rear from the center console.
- Disconnect the connector if equipped.
Installing
Install in reverse order of removal.
Installation notes, for example tightening specifications, replacing components. Refer to → Chapter "Overview - Center Console".
Center Console Insert, Removing and Installing
Special tools and workshop equipment required
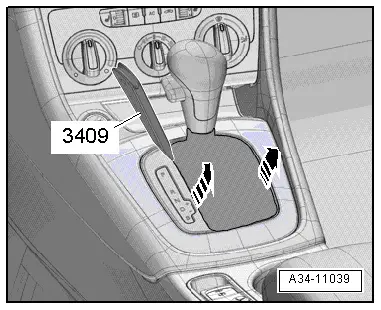
- Trim Removal Wedge -3409-
Removing
- Versions with a selector lever: move the selector lever into "D/S".
- Turn off the ignition.
- Carefully pry out the selector lever/shift lever boot at the side using a Trim Removal Wedge -3409- or small screwdriver -arrows- and fold it upward.
- To prevent damage to the surface, tape of the center console trim around the center console with adhesive tape.
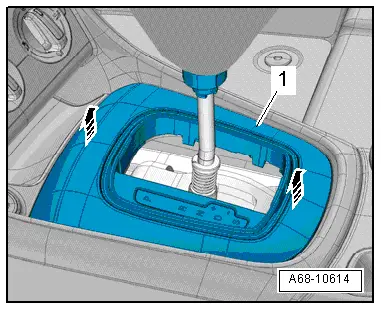
- Reach with the hand under the center console insert -1- and carefully remove it upward from the center console -arrows-.
- Disconnect the connectors and carefully remove the center console insert over the selector lever/gearshift lever.
Installing
Install in reverse order of removal.
Installation notes, for example tightening specifications, replacing components. Refer to → Chapter "Overview - Center Console".
READ NEXT:
 Front Center Console Storage Compartment, Removing and Installing
Front Storage Compartment, Removing and Installing
Removing
- Remove the center console insert. Refer to
→ Chapter "Center Console Insert, Removing and Installing".
- Release the
Center Console, Removing and Installing
Center Console, Removing and Installing
Removing
- Remove the center console insert. Refer to
→ Chapter "Center Console Insert, Removing and Installing".
- Versions with Access/St
Front Center Armrest
Overview - Front Center Armrest
1 - Front Center Armrest
Removing and installing. Refer to
→ Chapter "Front Center Armrest, Removing and Installing".
2 - Lower CSEE MORE:
Climate control system
Description
One of the following options may be available,
depending on vehicle equipment:
A deluxe automatic climate control system with
two zones to individually adjust temperature and air distribution for the
left and right
front sides 1)
A deluxe automatic climate control system with
thr
Brakes
General information
You can apply the vehicle's brakes using the brake
pedal.
Operating noise
Noises may occur when braking depending on the
speed, braking force, and outside conditions such
as temperature and humidity.
Braking effect
The response time from the brakes depends on
the weather and envi