Audi Q3: Front Brake Rotor, Removing and Installing
Brake Rotor, Removing and Installing, 1LJ, 1ZD Brakes
Removing
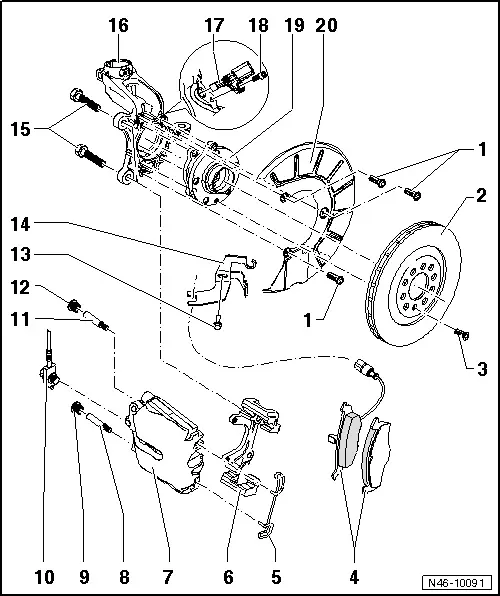
- Remove the affected brake caliper, refer to → Chapter "Brake Caliper, Removing and Installing, 1LJ, 1ZD Brakes".
- Remove bolt -3- and remove the brake rotor.
Installing
Install in reverse order of removal. Note the following:
- Thoroughly clean the brake rotor and hub contact surfaces.
- Place the brake rotor on the hub.
 Note
Note
Do not tilt the brake rotor when mounting it on the wheel hub.
- Tighten the bolt -3-.
- Install the brake caliper, refer to → Chapter "Brake Caliper, Removing and Installing, 1LJ, 1ZD Brakes".
 WARNING
Risk of accident!
- Before moving the vehicle, depress brake pedal several times firmly to properly seat brake pads in their normal operating position.
- Make sure the brakes are working correctly before driving the vehicle.

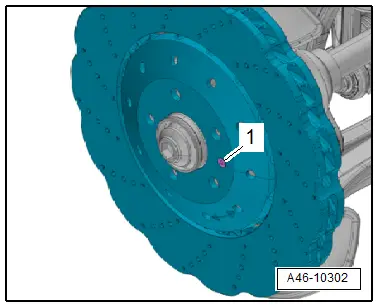
Brake Rotor, Removing and Installing, 1LA, 1ZT Brakes
Special tools and workshop equipment required
- Torque Wrench 1331 5-50Nm -VAG1331-
Removing
- Remove the affected brake caliper, refer to → Chapter "Brake Caliper, Removing and Installing, 1LA, 1ZT Brakes".
- Remove bolt -1- and remove the brake rotor.
Installing
Install in reverse order of removal. Note the following:
 Note
Note
- For the wear specification and wear limit, refer to → Chapter "Brakes Technical Data".
- Always replace brake rotors on both sides of the axle.
- Thoroughly clean the brake rotor and hub contact surfaces.
- Place the brake rotor on the hub.
 Note
Note
Do not tilt the brake rotor when mounting it on the wheel hub.
- Tighten the bolt -1-.
- Install the brake caliper, refer to → Chapter "Brake Caliper, Removing and Installing, 1LA, 1ZT Brakes".
 WARNING
Risk of accident!
- Before moving vehicle, depress brake pedal several times firmly to properly seat brake pads in their normal operating position.
- Make sure the brakes are working correctly before driving the vehicle.

Front Brake Shield, Removing and Installing
Brake Shield, Removing and Installing, 1LJ, 1ZD Brakes
Removing
- Remove the brake rotor, refer to → Chapter "Brake Rotor, Removing and Installing, 1LJ, 1ZD Brakes".
- Remove the bolts -1- and the brake shield -20-.
Installing
Install in reverse order of removal. Note the following:
- Clean the wheel hub and the brake shield.
- Position the brake shield on the wheel hub and tighten the bolts.
- Install the brake rotor, refer to → Chapter "Brake Rotor, Removing and Installing, 1LJ, 1ZD Brakes".
 WARNING
Risk of accident!
- Before moving vehicle, depress brake pedal several times firmly to properly seat brake pads in their normal operating position.
- Make sure the brakes are working correctly before driving the vehicle.
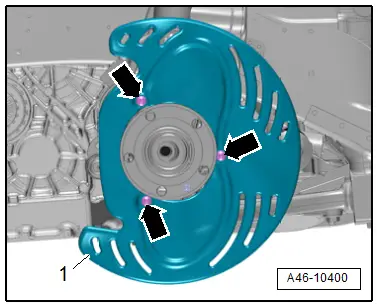
Brake Shield, Removing and Installing, 1LA, 1ZT Brakes
Special tools and workshop equipment required
- Torque Wrench 1331 5-50Nm -VAG1331-
Removing
- Remove brake rotor, refer to → Chapter "Brake Rotor, Removing and Installing, 1LA, 1ZT Brakes".
- Remove the bolts -arrows- and the cover plate -1-.
Installing
Install in reverse order of removal. Note the following:
- Install the brake rotor, refer to → Chapter "Brake Rotor, Removing and Installing, 1LA, 1ZT Brakes".
 WARNING
Risk of accident!
- Before moving vehicle, depress brake pedal several times firmly to properly seat brake pads in their normal operating position.
- Make sure the brakes are working correctly before driving the vehicle.
READ NEXT:
 Overview - Rear Brakes
Overview - Rear Brakes, Brakes 1KU
1 - Brake Shield
Removing and installing, refer to
→ Chapter "Brake Shield, Removing and Installing, Brakes 1KU".
2 - Brake Ro
Rear Brake Pads, Removing and Installing
Brake Pads, Removing and Installing, Brakes 1KU
If old brake pads are being replaced with new ones, then it
is necessary to check the brake rotor thickness for wear. Pay
attention to the wear spe
Rear Brake Caliper, Removing and Installing
Brake Caliper, Removing and Installing, Brake 1KU
Note
In the following description the brake caliper is removed
with the brake carrier and pads. The brake hose remains
connected.
SpecSEE MORE:
Correct passenger seating position
General information
As the driver, you are responsible for making sure
every passenger is sitting correctly in their seat
and maintaining this seating position while driving.
Make sure that:
Every passenger in the vehicle has adjusted his
or her seat correctly.
The steering wheel is adjusted co
Refrigerant Circuit, Cleaning (Flushing), with Refrigerant R134a
General Information
Vehicles with a High Voltage System (Hybrid Vehicles)
Extremely Dangerous Due to High-Voltage
The high-voltage system is under high-voltage. Death or serious
bodily injury by electric shock.
- Individuals with electronic/medical life- and health sustaining
machines i