Audi Q3: Overview - Door
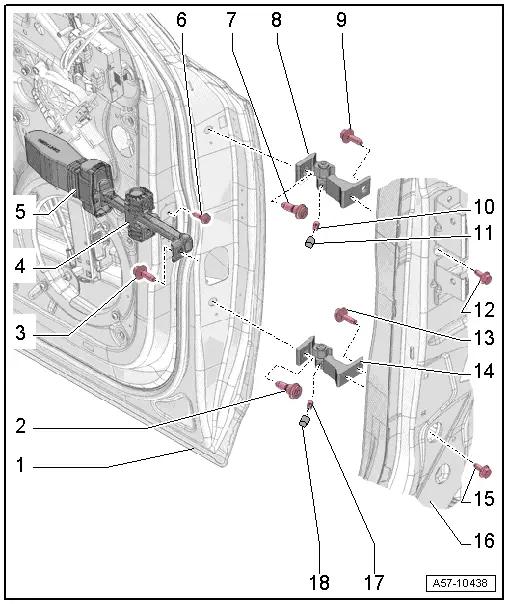
1 - Door
- Removing and installing. Refer to → Chapter "Door, Removing and Installing".
2 - Bolt
- 45 Nm
 Note
Note
- The bolt is a fitting bolt so it is generally not necessary to adjust the door using it.
- If it is necessary to make an adjustment using these bolts, the bolt can be replaced with one of the same length and strength category.
3 - Bolt
- 33 Nm
4 - Door Arrester
- Removing and installing. Refer to → Chapter "Door Arrester, Removing and Installing".
5 - Cap
- For the door arrester
- Observe installation direction
6 - Bolt
- 8 Nm
- Quantity: 2
7 - Bolt
- 45 Nm
 Note
Note
- The bolt is a fitting bolt so it is generally not necessary to adjust the door using it.
- If it is necessary to make an adjustment using these bolts, the bolt can be replaced with one of the same length and strength category.
8 - Upper Door Hinge
9 - Bolt
- 32 Nm
10 - Stud Bolt
- 23 Nm
11 - Cap
- Place on the stud bolt
12 - Bolt
- 32 Nm
13 - Bolt
- 32 Nm
14 - Lower Door Hinge
15 - Bolt
- 32 Nm
16 - A-Pillar
17 - Stud Bolt
- 23 Nm
18 - Cap
- Place on the stud bolt
Overview - Door Seals
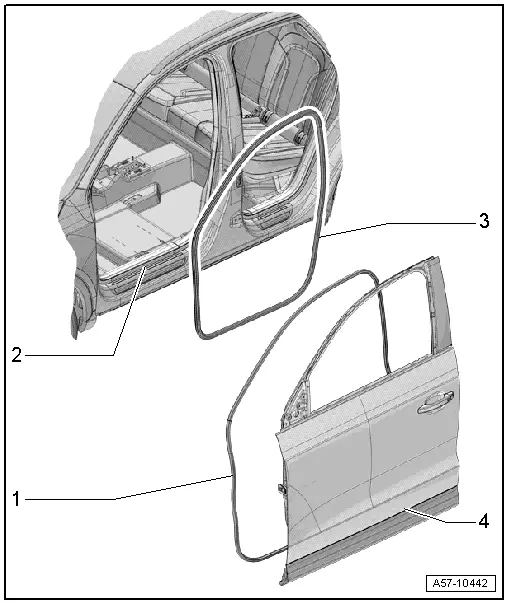
1 - Outer Door Seal
- Removing and installing. Refer to → Chapter "Outer Door Seal, Removing and Installing".
2 - Body
3 - Inner Door Seal
- Removing and installing. Refer to → Chapter "Inner Door Seal, Removing and Installing".
4 - Door
READ NEXT:
 Door, Removing and Installing
Removing
- Disconnect the door connector on the A-pillar. Refer to
→ Electrical Equipment; Rep. Gr.97; Connectors.
Note
Secure the A-pillar in the area of the door a
Door, Adjusting
Special tools and workshop equipment
required
Gauge - Gap Adjustment -3371-
Door Adjustment Template -T40038 /16-
Check the height adjustment using the Door Adjustment
Template -T40038 /1
Inner Door Seal, Removing and Installing
Removing
- Remove the upper A-pillar trim. Refer to
→ Body Interior; Rep. Gr.70; Passenger Compartment Trim;
A-Pillar Trim, Removing and Installing.
- Remove the front SEE MORE:
Additional safety belt functions
Belt retractor lock
The safety belts on the rear seats and on the
front passenger seat are equipped with a belt retractor
lock.
If you secure a child safety seat with a safety
belt, the belt retractor lock on the safety belt
may need to be activated. Follow the instructions
from the child safet
Ignition key
Applies to: vehicles with ignition lock
Fig. 80 Steering column: ignition lock
Starting the engine
Press the brake pedal.
Insert the ignition key into the ignition lock.
Turn the key briefly to position 2. The ignition
key automatically returns to position 1. Do not
press the accelerator peda
© 2019-2026 Copyright www.auq3.net | 0.0108
