Audi Q3: Door Handle, Removing and Installing
Lock Cylinder, Removing and Installing
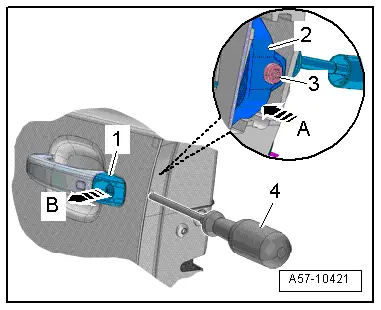
Removing
- Remove the sealing plugs.
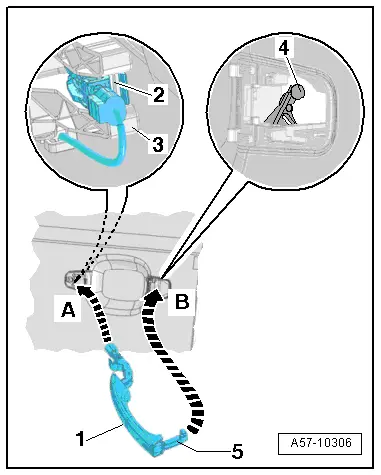
- Remove the clamping screw -3- until it stops using a screwdriver -4-.
- Press the lock cylinder retaining bracket -2- inward -arrow A-.
- Remove the lock cylinder -1- from the mounting bracket -arrow B-.
 Note
Note
If the lock cylinder cannot be pressed out, slide the key into it and remove it with the key turned slightly.
Installing
Install in reverse order of removal. Note the following:
- Slide the lock cylinder into the mounting bracket and then check if the door lock closing and opening position is activated.
Lock Cylinder Cap/Housing, Removing and Installing
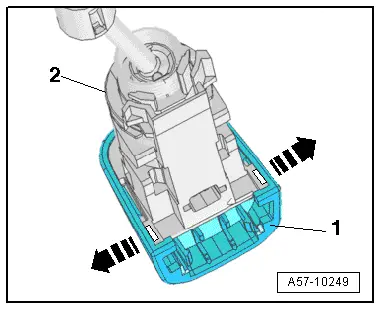
Removing
- Remove the lock cylinder/housing. Refer to → Chapter "Lock Cylinder, Removing and Installing".
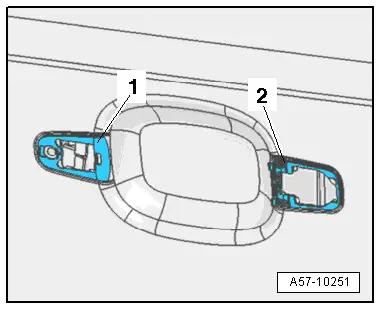
- Spread the clips -arrows- and remove the cover cap -1- from the lock cylinder/housing -2- using an awl if necessary.
Installing
Install in reverse order of removal. Note the following:
- Press the lock cylinder cover cap on until it engages audibly.
- Install the lock cylinder/housing. Refer to → Chapter "Lock Cylinder, Removing and Installing".
Door Handle, Removing and Installing
Removing
- Remove the lock cylinder/housing. Refer to → Chapter "Lock Cylinder, Removing and Installing".
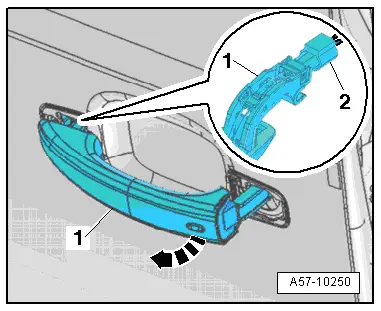
- Pull the exterior door handle -1- outward -arrow A- and hold in the "open" position.
- Press the lock cylinder/housing retaining bracket -2- inward -arrow B-. The exterior door handle is secured in the "opened" position.
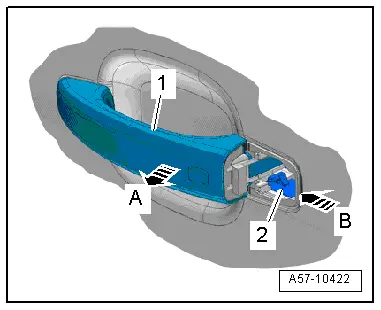
- Pull the exterior door handle -1- in the direction of the -arrow-. This disengages the handle from the operating lever in the mounting bracket.
- Tilt the exterior door handle -1- outward -arrow- and remove it from the mount on the mounting bracket.
- If the vehicle has comfort key, disconnect the connector -2- on the exterior door handle.
Installing
Install in reverse order of removal. Note the following:
- Replace the exterior door handle washers -1- and -2- if damaged or brittle.
- Insert the exterior door handle -1--arrow A-. It must engage in the mount -2- on the mounting bracket -3-.
- Tilt the exterior door handle in the direction of -arrow B- and slide the "coupling plate"-5- into the mounting bracket in front of the operating lever -4-.
- Install the lock cylinder/housing. Refer to → Chapter "Lock Cylinder, Removing and Installing".
Door Handle Trim, Removing and Installing
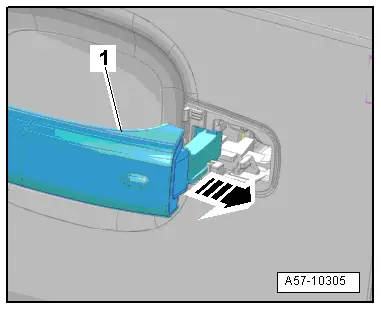
Removing
- Remove the outside door handle. Refer to → Chapter "Door Handle, Removing and Installing".
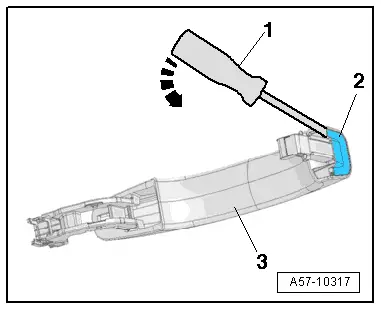
- Pry the exterior door handle trim -2- out using an awl -1- at the location shown in the illustration -arrow-.
- Remove the trim from the exterior door handle -3-.
Installing
Install in reverse order of removal. Note the following:
- Slide the exterior door handle trim in until it engages audibly.
- Install the exterior door handle. Refer to → Chapter "Door Handle, Removing and Installing".
READ NEXT:
 Door Lock, Removing and Installing
Door Lock, Removing and Installing
Caution
There is a risk of malfunctions.
The door lock must be removed and installed together
with the bracket to prevent over-bending the cable when
Central Locking
Component Location Overview - Central Locking
1 - Hood Contact Switch 2 -F329-
Inside the rear lid lock
Removing and installing. Refer to
→ Chapter "Engine Hood Contact SwiSEE MORE:
All wheel drive (quattro)
Description
Applies to: vehicles with all wheel drive
The all-wheel drive system distributes the driving
power variably to the front and rear axle to improve
the driving characteristics. It works together
with selective wheel torque control, which can
activate when driving through curves.
The all-
Tires with Emergency Running Characteristics, Seal Inside-Technology
Caution
It is mandatory for run-flat tires to have a tire
pressure monitoring system in the vehicle.
Examining and replacing the seal inside tires should
only be performed by trained personnel.
Note
The seal inside technology makes it possible to continue
driving with