Audi Q3: Air Quality Sensor -G238-, Removing and Installing
Removing
- Remove the plenum chamber cover. Refer to → Body Exterior; Rep. Gr.50; Bulkhead; Plenum Chamber Cover, Removing and Installing.
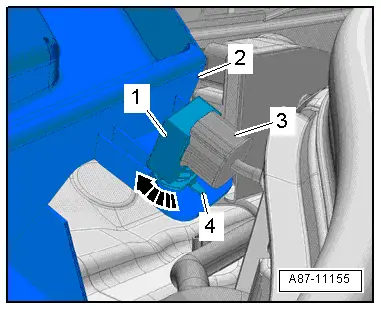
- Release the securing tab -4- and turn the housing -1- for the Air Quality Sensor -G238- counter-clockwise -arrow-.
- Remove the housing from the rain water drain channel -2- for the fresh air intake.
- Disconnect the connector -3-.
 Note
Note
Do not store a removed Air Quality Sensor -G238- in areas where it can come into contact with solvents, fuels, and certain chemical compositions (fluids or vapors).
Installing
Installation is done is reverse order, observe the following:
 Note
Note
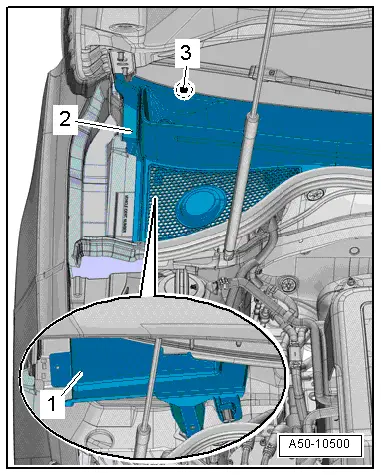
- So that no water enters into the A/C unit (heater) via the rain water drain channel -1- when the plenum chamber cover -2- is installed, the plenum chamber cover must not be damaged.
- If the plenum chamber cover is damaged or is installed incorrectly, water can flow into the fresh air intake duct via the rain water drain channel.
- The plenum chamber cover must be completely engaged in the windshield frame -3-. Refer to → Body Exterior; Rep. Gr.50; Bulkhead; Plenum Chamber Cover, Removing and Installing.
- Install the plenum chamber cover. Refer to → Body Exterior; Rep. Gr.50; Bulkhead; Plenum Chamber Cover, Removing and Installing.
READ NEXT:
 Outside Air Temperature Sensor -G17-, Removing and Installing
Note
Complaints may arise regarding the Air Conditioning (A/C)
system regulation if there is a faulty measured value for the
Outside Air Temperature Sensor -G17-. Refer to Vehicle
Diag
Humidity Sensor -G355-, Removing and Installing
Humidity Sensor -G355-, Removing and Installing, Vehicles without
Driver Assistance Systems Front Camera
Note
Only on vehicles with an automatic climate control system
There are diffSEE MORE:
Fuses and bulbs
Fuses
Replacing fuses
Fig. 171 Left side of the engine compartment: fuse cover 1
Fig. 172 Left side of the cockpit: storage compartment
(left-hand drive) 2 or storage compartment (right-hand
drive) 3
Fuses are installed in various locations in your vehicle.
The following information only lists f
Hinges, Removing and Installing
1 - Hood Hinge
Removing
Before removing a hood hinge, support the hood or secure it against
falling.
Remove the gas-filled strut. Refer to
→ Chapter "Gas-Filled Strut, Removing and Installing".
Unclip and remove the cover from the lid hinges.
Remove the bolts -