Audi Q3: Sunroof Frame, Removing and Installing
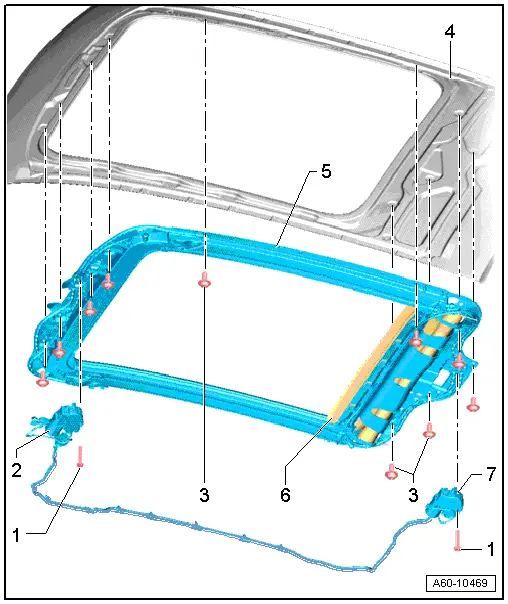
1 - Bolt
- 3 Nm
2 - Power Sunroof Control Module -J245-.
- Performing the adaptation procedure. Refer to → Chapter "Motor Adaptation".
3 - Bolt
- 8 Nm.
4 - Roof
5 - Panorama Roof Frame
- Removing
- Headliner removed.
- Disconnect electrical connectors.
- Remove the front and rear water drain hoses.
 Note
Note
- The side and center screws on the frame remain mounted until the end.
- Two technicians must hold the frame before the screws can be removed and the frame removed.
- Remove the screws up the left and right center screws.
- Holding the frame with a second technician, first loosen the center bolts and remove the frame rearward through the opening in the rear lid.
- Installing
- Secure the frame with the screws.
- Disconnect the frame at the securing holes with a 8 mm drill diameter at the front and rear.
- Follow installation sequence.
- Install the front and rear water drain hoses.
6 - Sunroof Shade
- Removing → Chapter "Sunroof Shade, Removing and Installing"
7 - Roof Shade Control Module -J394-
- Performing the adaptation procedure. Refer to → Chapter "Motor Adaptation".
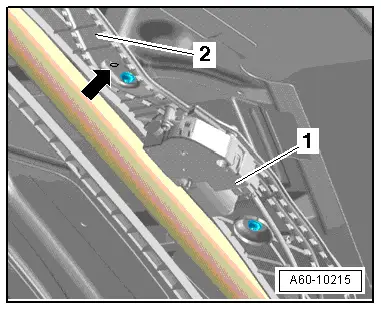
Attaching Points for the Frame
- When installing, the front right side of the frame -2--arrow- and the right rear (elongated hole) arrow must be secured near the motor -1- with an 8 mm diameter drill bit.
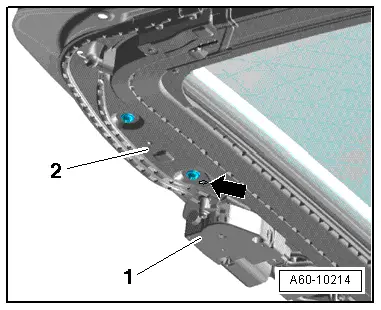
- ...and the right rear side (oblong hole) -arrow- next to the motor -1- with an 8 mm diameter drill bit.
- Tighten the screws first at the front and then at the rear to the tightening specification.
- Tighten the screws longitudinally alternating from rear to front to the tightening specification.
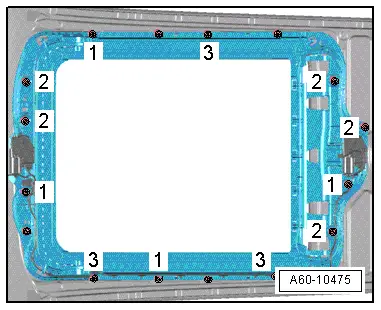
Tightening Sequence
- Tighten the bolts as shown in the sequence 1, 2, and 3 after each other to the tightening specification.
Wind Deflector, Removing and Installing

1 - Panorama Roof Frame
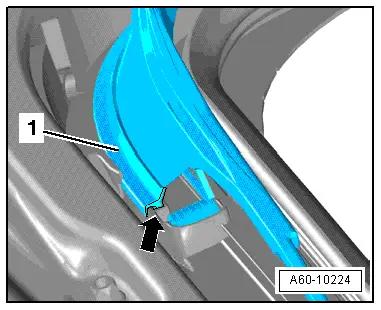
2 - Wind Deflector
- Open the panel "1" all the way.
- Disengage the wind deflector net from the frame beginning at the front, refer to → Fig. "Wind Deflector, Removing from the Frame".
- Raise the wind deflector and remove it from the bearing.
3 - Bolt
- 1 Nm
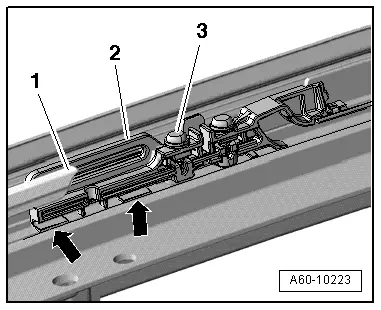
4 - Wind Deflector Spring
5 - Wind Deflector Bearing
- Removing
- Remove bolts -3-.
- Lift the lower bearing -arrows- from the groove, and remove sideways from the frame.
Wind Deflector, Removing from the Frame
- Starting on the side -arrow- remove the wind deflector net from the frame -1-.
Replace the Wind Deflector Bearing
- Wind deflector -1- removed.
- Remove the bolt -3-.
- Carefully pry the bearing -2- out of the groove at the marked locations -arrows- and slide it to the side without damaging the paint.
- Push it to the side and the bearing will lock into the groove.
READ NEXT:
 Glass Panel, Removing and Installing
Panel 1 for the Panorama Roof, Removing
Caution
Do not move or operate the already removed panel
otherwise it may become damaged.
Note
If the screws for the panel mounting wer
Sunroof Seals, Removing and Installing
Installing the Panel Seal
Note
Spray the seal with soapy solution to make the installation
easier.
- Align the seal in the center to the panel and push it into
the both front guid
Water Drain Hoses
Overview - Water Drain Hoses
1 - Front Water Drain Hose
Removing and installing. Refer to
→ Chapter "Water Drain Hoses, Removing and Installing".
Cleaning, refer to
→&nSEE MORE:
Overview - Headlamp
Overview - Headlamp, Headlamp Mount
1 - Ventilation Hose
For the headlamp housing
2 - Lover Mount
For the headlamp housing
Removing and installing. Refer to
→ Chapter "Lower Headlamp Housing Mount, Removing and Installing".
3 - Seal
4 -
Steering Column Electronics Control Module Connector Assignment
Steering Column Electronics Control Module -J527- Connector Assignment,
with Mechanical Ignition Lock
The Steering Column Electronics Control Module -J527- is
part of the complete system "steering column switch module". It
receives the signal for example from the steering column switch.
