Audi Q3: Overview - Electric Vacuum Pump
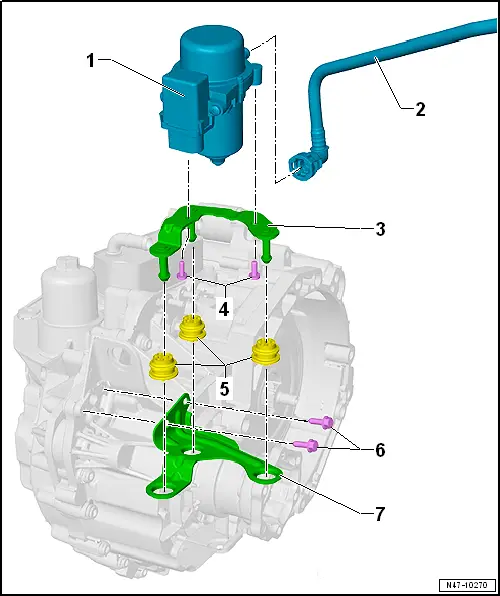
1 - Brake System Vacuum Pump -V192-
- Allocation, refer to the Parts Catalog.
- Installed location: in the engine compartment over the engine transmission separating point.
- Do not disassemble
- Removing and installing, refer to → Chapter "Electric Vacuum Pump, Removing and Installing".
2 - Vacuum Line
- With brake booster pressure sensor
- Allocation, refer to the Parts Catalog.
3 - Bracket
4 - Bolt
- 8 Nm
- Quantity: 2
5 - Rubber Insulation
- Quantity: 3
- Do not press out of bracket when installing
6 - Bolt
- 25 Nm
7 - Bracket
- Secured on the transmission
Overview - Vacuum Pump
Overview - Vacuum Pump, Vehicles with 2.0L TFSI Engine
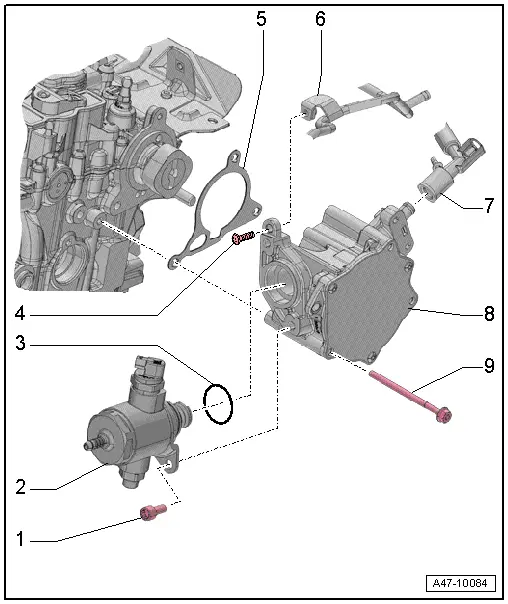
1 - Bolt
- Tightening specification, refer to → Engine Mechanical, Fuel Injection and Ignition; Rep. Gr.24; High Pressure Pump; Overview - High Pressure Pump.
2 - High Pressure Pump
- Removing and installing, refer to → Rep. Gr.24; High Pressure Pump; High Pressure Pump, Removing and Installing.
3 - O-Ring
4 - Bolt
- 9 Nm
5 - Seal
- Replacing
6 - Coolant Line
7 - Vacuum Hose
- With Vacuum Sensor -G608-
- Replace vacuum hose if damaged
- Vacuum Sensor -G608-, removing and installing, refer to → Chapter "Vacuum Sensor -G608-, Removing and Installing".
8 - Vacuum Pump
- The vacuum pump is mechanically driven.
- Vacuum system, checking, refer to → Chapter "Vacuum System, Checking".
- Removing and installing, refer to → Chapter "Vacuum Pump, Removing and Installing, Vehicles with 2.0L TFSI Engine".
9 - Bolt
- 9 Nm
Overview - Vacuum Pump, Vehicles with TDI Engine
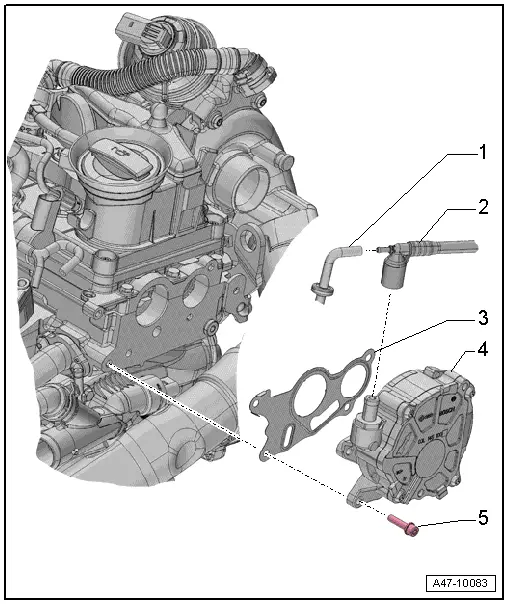
1 - Vacuum Hose
- Replace if damaged
2 - Vacuum Line
- Replace if damaged
3 - Seal
- Replacing
4 - Vacuum Pump
- The vacuum pump is mechanically driven.
- Vacuum System, Checking, refer to → Chapter "Vacuum System, Checking".
- Removing and installing, refer to → Chapter "Vacuum Pump, Removing and Installing, Vehicles with TDI Engine".
5 - Bolt
- 9 Nm
READ NEXT:
 Check Valve, Checking
Check valve is removed, refer to
→ Chapter "Check Valve, Removing and Installing".
Note
The check valve is installed directly in front of the vacuum
pump.
Valve must all
Vacuum Sensor -G608-, Removing and Installing
Removing
Audi Q3:
- Open the clamps -arrows- and
remove the air guide pipe -1-.
- Disconnect the connector -2-.
- Remove the vacuum hose -3-.
Audi RS Q3:
- Loosen the h
Vacuum Pump, Removing and Installing
Vacuum Pump, Removing and Installing, Vehicles with 2.0L TFSI Engine
Removing
- Remove the engine cover, refer to
→ Rep. Gr.10; Engine Cover; Engine Cover, Removing and
InstalliSEE MORE:
Adjusting side assist
Applies to: vehicles with side assist
You can adjust the side assist to your preferences.
The settings depend on the vehicle equipment.
Applies to: MMI: Select on the home screen:
VEHICLE > Driver assistance > Side assist.
Possible settings:
The system can be switched on and off. If the s
Locking Mechanism Trim, Removing and Installing
Special tools and workshop equipment
required
Trim Removal Wedge -3409-
Removing
- Unlock the rear seat backrest.
- Make sure the button -2-
(indicator) is in the "up" position.
- Push the tabs -arrows- on both
sides of the trim using a Trim Removal Wedge -3409-.
-&nb
© 2019-2026 Copyright www.auq3.net | 0.0111
