Audi Q3: Overview - Seat Pan
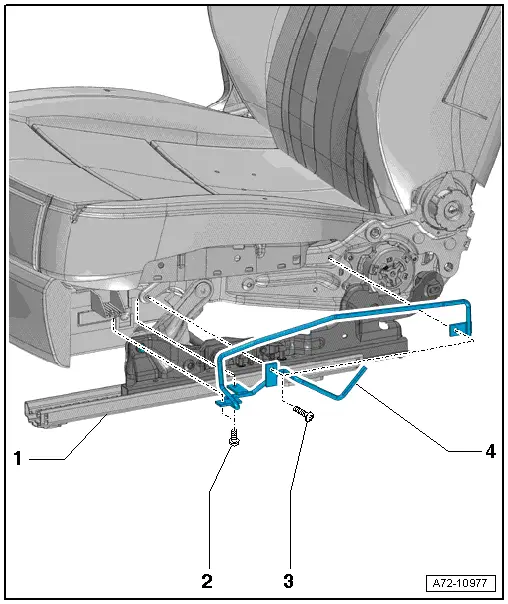
Overview - Seat Pan, Modular Wiring Routing
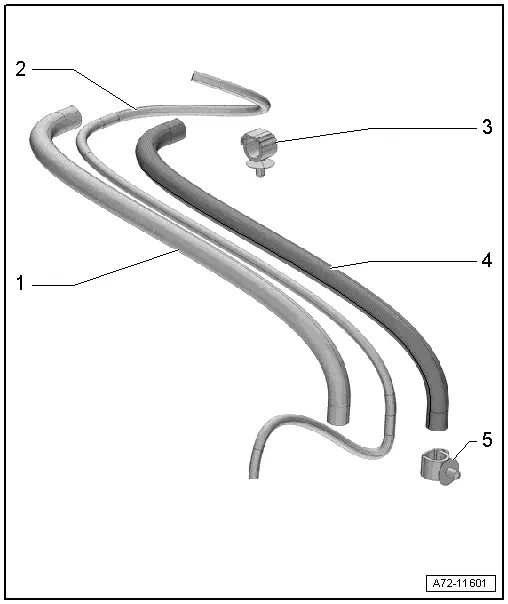
1 - Corrugated Tube Upper Section
- Must terminate flush with the wiring bracket
- Must terminate flush with the corrugated tube lower section
2 - Wiring Harness
- Do not twist installed wires
3 - Rear Wiring Bracket
- Attach back at the same location when installing
- Clipped into the seat pan.
4 - Corrugated Tube Lower Section
- Must terminate flush with the wiring bracket
- Must terminate flush with the corrugated tube upper section
5 - Front Wiring Bracket
- Attach back at the same location when installing
- Clip in on the sill panel
Overview - Seat Pan, Sill Panel/Tunnel Side Seat Side Trim on Manual Front Seat
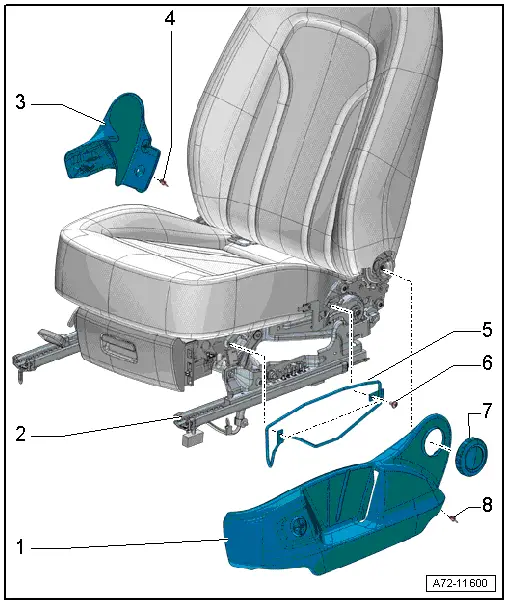
1 - Seat Side Sill Panel Trim
- Removing and installing. Refer to → Chapter "Seat Side Trim on Sill Panel Side, Removing and Installing, Manual Front Seat".
2 - Front Seat
3 - Seat Side Trim on the Tunnel Side
- Removing and installing. Refer to → Chapter "Seat Side Trim on the Tunnel Side, Removing and Installing".
4 - Expanding Rivet
5 - Bracket
- For seat side sill panel trim
- Removing and installing. Refer to → Chapter "Seat Side Trim on Sill Panel Side, Removing and Installing, Manual Front Seat".
6 - Bolt
- 8 Nm
- Quantity: 2
7 - Hand Wheel
- For backrest adjustment
- Removing and installing. Refer to → Chapter "Backrest Adjustment Hand Wheel, Removing and Installing".
- Press on until it engages audibly
8 - Expanding Rivet
Overview - Seat Pan, Sill Panel/Tunnel Side Seat Side Trim on Folding Passenger Seat
Sill Panel/Tunnel Side Seat Side Trim
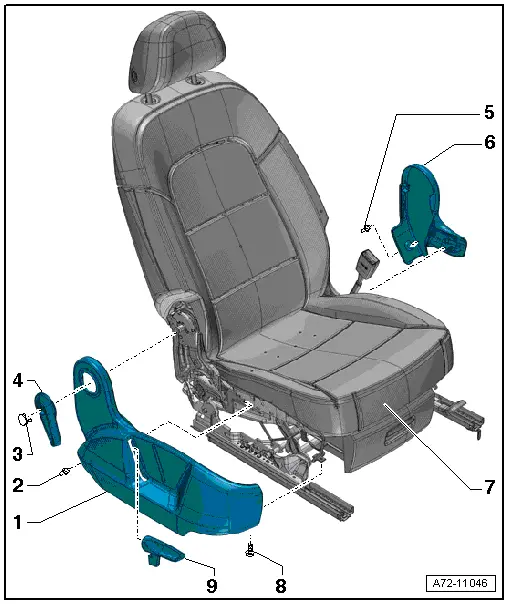
1 - Seat Side Sill Panel Trim
- can be replaced with seat installed
- Removing and installing. Refer to → Chapter "Seat Side Trim on Sill Panel Side, Removing and Installing, Passenger Folding Seat".
- Push in until fully engaged in the bracket.
2 - Expanding Clip
3 - Cap
- Press until it engages completely
4 - Release Lever
- For the backrest
- Removing and installing. Refer to → Chapter "Backrest Release, Removing and Installing".
- Press until it engages completely
5 - Expanding Clip
6 - Seat Side Trim on the Tunnel Side
- Can be replaced only with the seat removed
- Removing and installing. Refer to → Chapter "Seat Side Trim on the Tunnel Side, Removing and Installing".
7 - Front Folding Seat
- Passenger seat only
8 - Bolt
- 8 Nm
9 - Seat Height Adjustment Handle
- Removing and installing. Refer to → Chapter "Seat Height Adjuster, Removing and Installing".
- Push the handle all the way on
Sill Panel Seat Side Trim Bracket
1 - Front Seat
2 - Bolt
- 8 Nm
- Quantity: 2
3 - Bolt
- 8 Nm
- Quantity: 2
4 - Bracket
- For seat side sill panel trim
- Removing and installing. Refer to → Chapter "Seat Side Trim on Sill Panel Side, Removing and Installing, Passenger Folding Seat".
READ NEXT:
 Overview - Seat Pan, Sill Panel/Tunnel Side Seat Side Trim on Power Front
Seat
Overview - Seat Pan, Sill Panel/Tunnel Side Seat Side Trim on Power Front
Seat
1 - Bolt
Quantity: 3
8 Nm
2 - Front Seat
3 - Seat Side Trim on the Tunnel Side
Removing and installing. Refer to
→ Chapter "Seat Side Trim o
Overview - Seat Pan, Drawer
1 - Retaining Tab
2 - Drawer
3 - Bolt
1.5 Nm
4 - Bolt
1.5 Nm
5 - Mount
For the drawer
Removing and installing. Refer to
→&
Front Seat, Removing and Installing
Front Seat, Removing and Installing, Manual/Power
Special tools and workshop equipment
required
Universal Vehicle Protector -VAS871 001-
Airbag Lockout Adapter -VAS6282-
Removing
SEE MORE:
Repair Information
Minimum Curing Time for Bonded Windows
WARNING
For safety reasons, use only electrically
non-conductive 2C-adhesive when installing windshield
and rear window using the materials listed below.
The vehicle can only be used after the minimum
curing time has elapsed.
Window
Locking Mechanism Trim, Removing and Installing
Special tools and workshop equipment
required
Trim Removal Wedge -3409-
Removing
- Unlock the rear seat backrest.
- Make sure the button -2-
(indicator) is in the "up" position.
- Push the tabs -arrows- on both
sides of the trim using a Trim Removal Wedge -3409-.
-&nb