
Audi Q3: Overview - Rear Outer Three-Point Seat Belt
Body Interior / Body / Audi Q3 (8U) 2011-2018 Service Manual / Overview - Rear Outer Three-Point Seat Belt
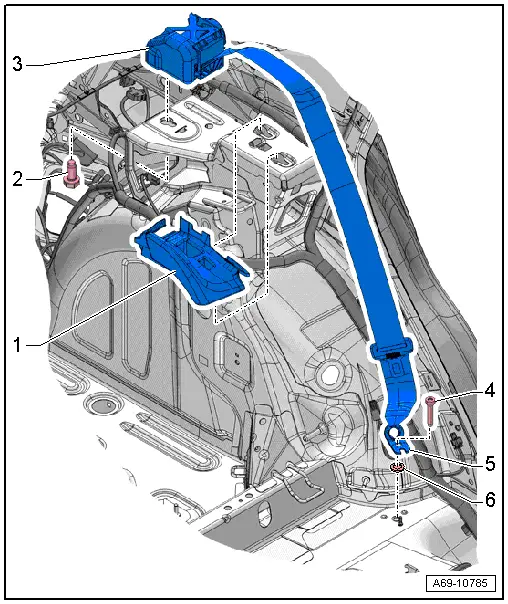
1 - Belt Guide
 Caution
- Do not rotate bolts under any circumstances when removing and installing belt guide. They are set by the manufacturer.
- Replace the entire belt guide if damaged.
- Removing and installing. Refer to → Chapter "Rear Seat Belt Guide, Removing and Installing".
- Place in the bolt heads on the guides on the console and pull forward until the catches engage audibly.
2 - Bolt
- If it was removed because of an accident, replace the bolt
- 45 Nm
3 - Automatic Belt Retractor
- Driver side: USA and Canada market-specific with Driver Side Rear Seat Belt Tensioner Igniter -N196-
- Front passenger side: USA and Canada market-specific with Passenger Side Rear Seat Belt Tensioner Igniter -N197-
- Removing and installing. Refer to → Chapter "Outer Rear Three-Point Seat Belt, Removing and Installing".
4 - Bolt
- 45 Nm
- If it was removed because of an accident, replace the bolt
5 - Outer Rear Belt End Fitting
- Removing and installing. Refer to → Chapter "Rear Outer Belt End Fitting, Removing and Installing".
6 - Seal
- Slide over the bolt thread and turn it all the way until it stops.
Overview - Rear Center Three-Point Seat Belt
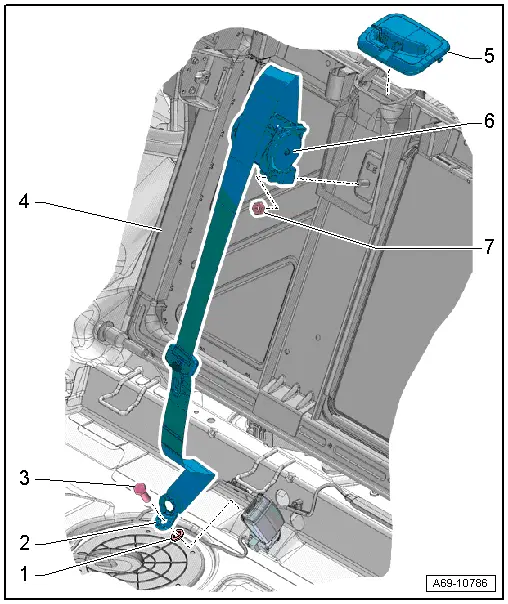
1 - Seal
- Slide over the bolt thread and turn it all the way until it stops.
2 - Center Rear Belt End Fitting
- Removing and installing. Refer to → Chapter "Rear Seat Belt Latch, Removing and Installing".
3 - Bolt
- Tightening specification. Refer to → Chapter "Overview - Rear Seat Belt Latch".
4 - Right 2/3 Rear Seat Backrest
5 - Rear Center Belt Guide
- Replace the entire belt guide if damaged.
- Removing and installing. Refer to → Chapter "Rear Seat Belt Guide in Center Seating Position, Removing and Installing".
- Press on until it engages audibly
6 - Automatic Belt Retractor
- Removing and installing. Refer to → Chapter "Rear Three Point Seat Belt in Center Seating Position, Removing and Installing".
7 - Nut
- 45 Nm
- If it was removed because of an accident, replace the nut
Overview - Front Seat Belt Latch
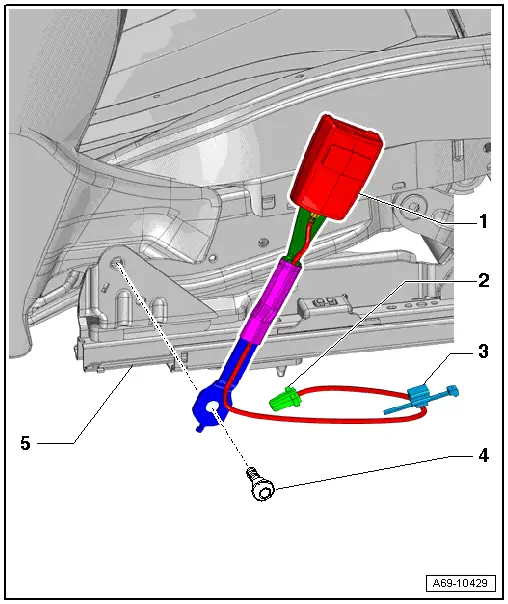
1 - Front Seat Belt Latch
- Driver side: with Driver Seat Belt Switch -E24-
- Front passenger side: with Front Passenger Seat Belt Switch -E25-
- Removing and installing. Refer to → Chapter "Front Seat Belt Latch, Removing and Installing".
- Always replaced if the belt tensioner has deployed with the belt on
2 - Connector
- For the seat belt switch
3 - Wiring Bracket
4 - Bolt
- 34 Nm
- If it was removed because of an accident, replace the bolt
5 - Front Seat
Overview - Rear Seat Belt Latch
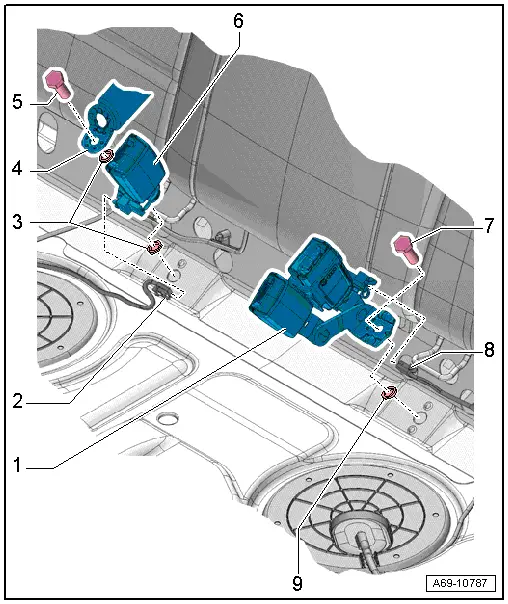
1 - Seat Belt Latch
- With Driver Side Rear Seat Belt Switch -E258-
- USA and Canada market-specific without seat belt switch
- Removing and installing. Refer to → Chapter "Rear Seat Belt Latch, Removing and Installing".
- Always replaced if the belt tensioner has deployed with the belt on
- Align with the direction of travel when bolting it on
- The tabs on the floor panel must be between the recesses on the bolting surface of the seat belt latch.
2 - Connector
- For Passenger Side Rear Seat Belt Switch -E259-
- Equipment levels
3 - Seals
- Slide over the bolt thread and turn it all the way until it stops.
4 - Center Rear Belt End Fitting
- Removing and installing. Refer to → Chapter "Rear Seat Belt Latch, Removing and Installing".
5 - Bolt
- 45 Nm
- If it was removed because of an accident, replace the bolt
6 - Seat Belt Latch
- with Passenger Side Rear Seat Belt Switch -E259-
- USA and Canada market-specific without seat belt switch
- Removing and installing. Refer to → Chapter "Rear Seat Belt Latch, Removing and Installing".
- Always replaced if the belt tensioner has deployed with the belt on
- Align with the direction of travel when bolting it on
- The tabs on the floor panel must be between the recesses on the bolting surface of the seat belt latch.
7 - Bolt
- 45 Nm
- If it was removed because of an accident, replace the bolt
8 - Connector
- For the Driver Side Rear Seat Belt Switch -E258-
- Equipment levels
9 - Seal
- Slide over the bolt thread and turn it all the way until it stops.
READ NEXT:
 Front Three-Point Seat Belt, Removing and Installing
Removing
WARNING
Follow all safety precautions when working with
pyrotechnic components. Refer to
→ Chapter "Pyrotechnic
Rear Three-Point Seat Belt, Removing and Installing
Outer Rear Three-Point Seat Belt, Removing and Installing
Removing
- Remove the rear outer belt end fitting. Refer to
→ Chapter "Rear Outer Belt End Fitting, Removing and Installing".
Front Belt End Fitting, Removing and Installing
Front Belt End Fitting, Removing and Installing, USA and Canada
Market-Specific
Removing
- Remove the front seat. Refer to
→ Chapter "Front Seat, Removing and Installing".
- ReSEE MORE:
myAudi navigation
Applies to: vehicles with myAudi navigation
MMI navigation works seamlessly with the myAudi
app.
Your destinations (favorites, last destinations)
are synchronized through your myAudi account.
All important destinations can be displayed in
the vehicle and in the myAudi app.
To load destinations in
General information
Selecting the radio
Fig. 136 Center display: FM station list
Fig. 137 Center display: SiriusXM station list
Depending on the vehicle equipment, the radio
may support the FM, AM, and SiriusXM (satellite
radio) frequency bands. Using the HD Radio receiver
also allows you to receive radio stations
on
© 2019-2026 Copyright www.auq3.net | 0.0126
