Audi Q3: Overview - Door

1 - Door
- Removing and installing. Refer to → Chapter "Door, Removing and Installing".
2 - Bolt
- 45 Nm
 Note
Note
- The bolt is a fitting bolt so it is generally not necessary to adjust the door using it.
- If it is necessary to make an adjustment using these bolts, the bolt can be replaced with one of the same length and strength category.
3 - Bolt
- 33 Nm
4 - Door Arrester
- Removing and installing. Refer to → Chapter "Door Arrester, Removing and Installing".
5 - Cap
- For the door arrester
- Observe installation direction
6 - Bolt
- 8 Nm
- Quantity: 2
7 - Bolt
- 45 Nm
 Note
Note
- The bolt is a fitting bolt so it is generally not necessary to adjust the door using it.
- If it is necessary to make an adjustment using these bolts, the bolt can be replaced with one of the same length and strength category.
8 - Upper Door Hinge
9 - Bolt
- 32 Nm
10 - B-Pillar
11 - Stud Bolt
- 23 Nm
12 - Cap
- Place on the stud bolt
13 - Bolt
- 32 Nm
14 - Bolt
- 32 Nm
15 - Lower Door Hinge
16 - Bolt
- 32 Nm
17 - Stud Bolt
- 23 Nm
18 - Cap
- Place on the stud bolt
Overview - Door Seals
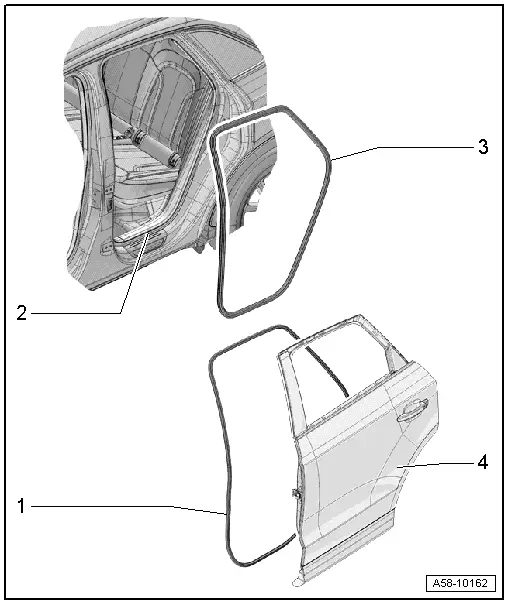
1 - Outer Door Seal
- Removing and installing. Refer to → Chapter "Outer Door Seal, Removing and Installing".
2 - Body
3 - Inner Door Seal
- Removing and installing. Refer to → Chapter "Inner Door Seal, Removing and Installing".
4 - Door
READ NEXT:
 Door, Removing and Installing
Removing
- Disconnect the door connector from the B-pillar. Refer to
→ Electrical Equipment; Rep. Gr.97; Connectors.
Note
Secure the B-pillar in the area of the door
Door, Adjusting
Special tools and workshop equipment
required
Gauge - Gap Adjustment -3371-
Door Adjustment Template -T40038 /16-
Check the Height Adjustment using the Door Adjustment
Template -T40038 /1
Inner Door Seal, Removing and Installing
Removing
- Remove the rear sill panel strip. Refer to
→ Body Interior; Rep. Gr.70; Passenger Compartment Trim; Sill
Panel Strip, Removing and Installing.
- Remove the uSEE MORE:
Overview - Brake Booster/Master Brake Cylinder
Note
Brake master cylinder and brake boosters can be replaced
independently of one another.
1 - Heat Shield
2 - Nut
25 Nm
Always replace if removed
Self-locking
3 - Sealing Plug
Coat with brake fluid and press into brake fluid reservo
Left/Right Front Turn Signal Bulb -M5- / -M7-, Removing and Installing
Left/Right Front Turn Signal Bulb -M5-/-M7-, Removing and Installing,
Halogen Headlamps
Removing
- Remove the headlamp housing. Refer to
→ Chapter "Headlamp, Removing and Installing, Halogen Headlamps".
- Remove the turn signal housing cover
-1- from the headlamp housing in
© 2019-2026 Copyright www.auq3.net | 0.0106
