Audi Q3: Instrument Panel Vent, Removing and Installing
Side Instrument Panel Vent, Removing and Installing
Special tools and workshop equipment required
- Hook Tool -T40207-
Removing
 Note
Note
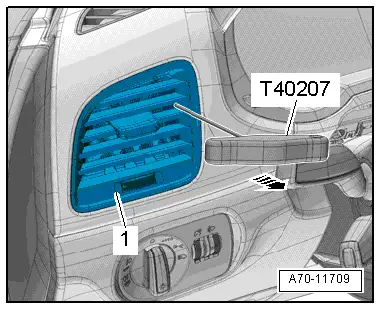
The vent has a hole on inside for attaching the Hook Tool -T40207-.
- Carefully insert the Hook Tool -T40207- between the slats and hook it into the side of the vent.
- Carefully remove the vent -1- from the installation opening -arrow-.
- Disconnect the connector and remove the instrument panel vent.
Installing
Install in reverse order of removal.
Installation notes, for example tightening specifications, replacing components. Refer to → Chapter "Overview - Instrument Panel".
Center Instrument Panel Vent, Removing and Installing
Special tools and workshop equipment required
- Hook Tool -T40207-
Removing
 Note
Note
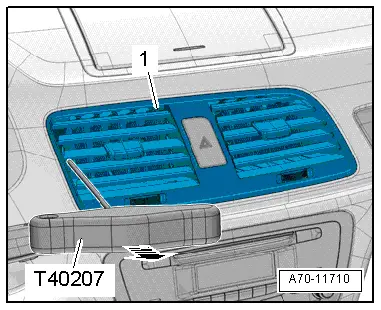
The vent has a hole on both sides for attaching the Hook Tool -T40207-.
- Carefully insert the Hook Tool -T40207- between the slats and hook it into the side of the vent.
- Alternating between the sides, carefully remove the vent -1- from the installation opening -arrow-.
- Disconnect the connectors and remove the instrument panel vent.
Installing
Install in reverse order of removal.
Installation notes, for example tightening specifications, replacing components. Refer to → Chapter "Overview - Instrument Panel".
Front Center Defroster Vent, Removing and Installing
Special tools and workshop equipment required
- Trim Removal Wedge -3409-
- Wedge Set -T10383-
Removing
- Pry the defroster vent -1- with the Wedge -T10383/1- and the Trim Removal Wedge - 3409- from the instrument panel -arrows- and remove toward the rear.
- Remove the defroster vent until it is possible to disconnect the Sunlight Photo Sensor -G107-.
Installing
Install in reverse order of removal.
Installation notes, for example tightening specifications, replacing components. Refer to → Chapter "Overview - Instrument Panel".

Side Defroster Vent, Removing and Installing
Special tools and workshop equipment required
- Trim Removal Wedge -3409-
Removing
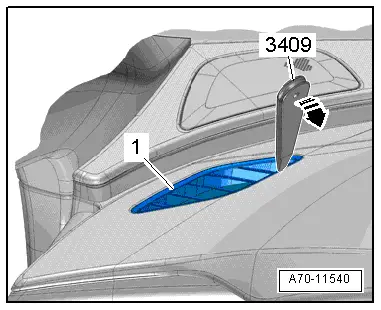
- Remove the defroster vent -1- from the instrument panel -arrow- using a Trim Removal Wedge -3409-.
Installing
Install in reverse order of removal.
Installation notes, for example tightening specifications, replacing components. Refer to → Chapter "Overview - Instrument Panel".
READ NEXT:
 Instrument Panel Central Tube
Overview - Instrument Panel Central Tube
1 - Bolt
20 Nm
2 - Nut
23 Nm
Quantity: 2
Always replace if removed
3 - Threaded Pin
20 Nm
Component Location Overview - Passenger Compartment Trim
1 - Cover
Overview. Refer to
→ Chapter "Overview - C-Pillar Trim Panel".
2 - Rear Sill Panel Strip
Overview. Refer to
→ Chapter "Overview - Rear Sill
Overview - A-Pillar Trim Panel
1 - Lower Clamp
Without hooks
Replace damaged or deformed clips
Insert in the trim panel
Remove any remaining clips in the body mounting points using the
Omega Clip Tool -T4028SEE MORE:
Door Lock, Removing and Installing
Door Lock, Removing and Installing
Caution
There is a risk of malfunctions.
The door lock must be removed and installed together
with the bracket to prevent over-bending the cable when
disengaging and engaging it.
The cable must be disconnected from/attached to the
lever on the d
Trim Molding, Removing and Installing
Special tools and workshop equipment
required
Wedge Set -T10383-
Removing
Note
Do not twist or bend the side window trim molding.
- Removing the roof trim molding. Refer to
→ Chapter "Roof Trim Molding, Removing and Installing".
- Tape off the area around the