Audi Q3: Front Brake Caliper Balance Weight
Depending on the model for each brake caliper two vibration dampers are installed.
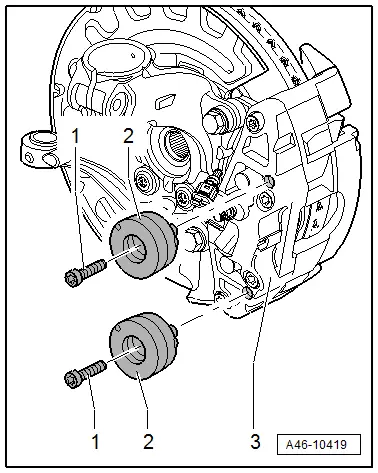
1 - Bolt
- 10 Nm
- Replace after each removal.
2 - Vibration Damper
- Installed 2 on each brake caliper
- Removing and installing, refer to → Chapter "Damper, Removing and Installing"
3 - Brake Caliper
Damper, Removing and Installing
Installed 2 on Each Brake Caliper
Removing
- Remove the existing dust cap.
- Remove the bolt -1-.
- Remove the vibration damper -2- from the brake caliper -3-.
Installing
Installed 2 on Each Brake Caliper
- Clean the brake caliper around the balance weight.
- Install the damper -2- in the brake caliper.
- Install the new bolt and tighten -item 1-.
- Replace the existing dust cap.

READ NEXT:
 Front Brake Pads, Removing and Installing
Brake Pads, Removing and Installing, 1LJ, 1ZD Brakes
If old brake pads are being replaced with new ones, then it is necessary
to check the brake rotor thickness for wear. Pay attention to the wear
Front Brake Caliper, Removing and Installing
Brake Caliper, Removing and Installing, 1LJ, 1ZD Brakes
Note
In the following description the brake caliper is removed
with the brake carrier and pads. The brake hose remains
connected.
Front Brake Caliper, Replacing
Brake Caliper, Replacing,1LJ, 1 ZD Brakes
Note
In the following description the brake caliper is removed
and replaced. The brake hose is removed.
Special tools and workshop equipment
rSEE MORE:
Door Windows
Overview - Front Door Window
1 - Door Window
Removing and installing. Refer to
→ Chapter "Front Door Window, Removing and Installing".
2 - Door
3 - Driver Window Regulator Motor -V147-
4 - Speaker
Removing. Refer to
→ Communic
Infotainment System Display, Removing and Installing
Infotainment System Display, Removing and Installing
The Front Information Display Control Head -J685- (Display)
is located in the center of the instrument panel.
The display and display support are a single unit and are
removed together. After its removal the display is removed from
the dis
© 2019-2026 Copyright www.auq3.net | 0.0094
