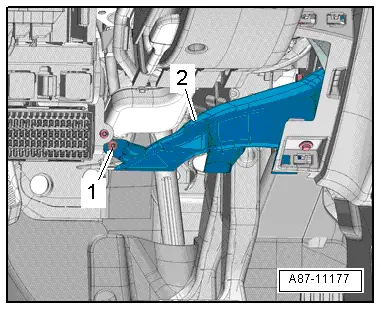
Audi Q3: Driver Side Footwell Vent, Removing and Installing
Removing
- Remove the driver side instrument panel cover. Refer to → Body Interior; Rep. Gr.68; Storage Compartments and Covers; Driver Side Instrument Panel Cover, Removing and Installing.
- Remove the bolt -1-.
- Remove the footwell vent -2-.
Installing
Installation is done is reverse order, observe the following:
- Install the driver side instrument panel cover. Refer to → Body Interior; Rep. Gr.68; Storage Compartments and Covers; Driver Side Instrument Panel Cover, Removing and Installing.
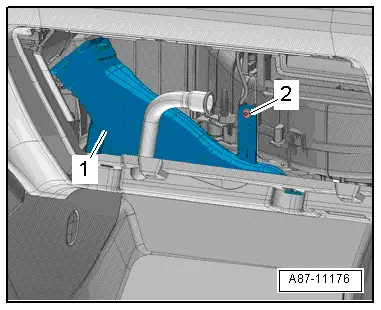
Front Passenger Side Footwell Vent, Removing and Installing
Removing
- Remove the glove compartment. Refer to → Body Interior; Rep. Gr.68; Storage Compartments and Covers; Glove Compartment, Removing and Installing.
- Remove the bolt -2-.
- Remove the footwell vent -1-.
Installing
Installation is done is reverse order, observe the following:
- Install the glove compartment. Refer to → Body Interior; Rep. Gr.68; Storage Compartments and Covers; Glove Compartment, Removing and Installing.
Rear Footwell Vent, Removing and Installing
Removing
- Remove the affected seat (driver- or front passenger seat). Refer to → Body Interior; Rep. Gr.72; Front Seats; Front Seat, Removing and Installing.
- Lift the carpet far enough so that the footwell vent can be removed. Refer to → Body Interior; Rep. Gr.70; Passenger Compartment Trim; Carpet, Removing and Installing.
- Loosen the rear footwell vent -1- from the retainers on the body -3--arrows-.
- Pull the rear footwell vent out of the air guide channel -2- and remove it.
Installing
Installation is done is reverse order, observe the following:
- Install the carpet. Refer to → Body Interior; Rep. Gr.70; Passenger Compartment Trim; Carpet, Removing and Installing.
- Install the removed affected seat (driver- or front passenger seat). Refer to → Body Interior; Rep. Gr.72; Front Seats; Front Seat, Removing and Installing.

READ NEXT:
 Air Distribution Channels, Removing and Installing
Center Instrument Panel Vent Air Guide, Removing and Installing
Removing
- Remove the instrument panel. Refer to
→ Body Interior; Rep. Gr.70; Instrument Panel; Instrument Pan
Passenger Compartment Forced Air Extraction, Checking
Ventilation Slots in Luggage Compartment, Checking
Test Sequence
- Check the left and right air guides through the vent
openings -arrow- built into the
luggage compartment side trim panel -SEE MORE:
Safety systems monitoring
The
indicator light in the instrument cluster
monitors the safety systems such as the airbags
(including the control modules, sensor, and wiring)
and the belt tensioners. It turns on when you
switch the ignition on and turns off after several
seconds.
If the indicator light does not turn on when
Tread Depth, Measuring
Tread Depth, Measuring
Note
When measuring tread depth, take measurements in the main
grooves.
Do not measure on the TWI (tread wear indicator).
Tread depth of a tire must be measured in the main grooves
at the points showing the most wear. Main tread grooves can be
recogniz