Audi Q3: Door, Removing and Installing
Removing
- Disconnect the door connector from the B-pillar. Refer to → Electrical Equipment; Rep. Gr.97; Connectors.
 Note
Note
Secure the B-pillar in the area of the door arrester using adhesive tape, so that the paint will not be damaged.
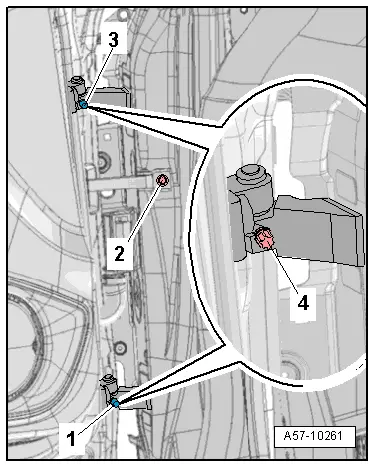
- Remove the door arrester bolt -2-.
- Remove the cover caps -1- and -3- from the stud bolts.
- Remove the stud bolts -4- on the upper and lower door hinge.
 Caution
There is a risk of damaging the paint.
Protect the painted surfaces on the door or on the side panel from damage.
- Carefully remove the door upward out of the door hinges.
Installing
- Gap dimensions.
Install in reverse order of removal. Note the following:
 Note
Note
Do not make any adjustments after installing the door.
Door Arrester, Removing and Installing
Removing
 Note
Note
Secure the B-pillar in the area of the door arrester using adhesive tape, so that the paint will not be damaged.
- Move the door window into the "closed" position.
- Remove the door trim panel. Refer to → Body Interior; Rep. Gr.70; Rear Door Trim Panels; Rear Door Trim Panel, Removing and Installing.
- Remove the lower speaker. Refer to → Communication; Rep. Gr.91; Component Location Overview - Sound System.
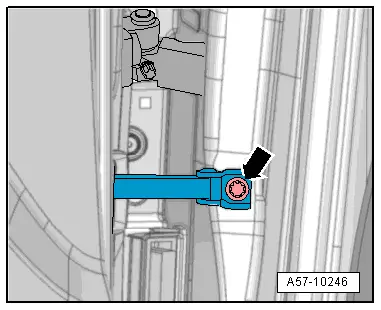
- Remove the door arrester bolt -arrow-.
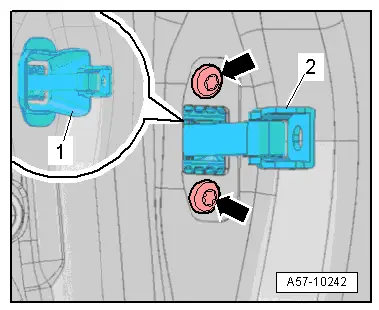
- If equipped, remove the door arrester cover -1- from the door opening.
- Remove the bolt -arrows- and remove the door arrester -2- inward.
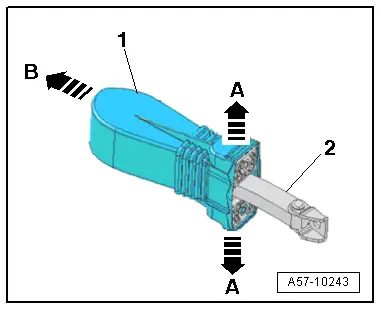
- Pull the rubber grommet -1- on the door arrester to the side slightly -A arrows-.
- Remove the rubber grommet from the door arrester -2--arrow B-.
Installing
Install in reverse order of removal. Note the following:
- Push the rubber seal on the door arrester, while doing so pay attention to the allocation of the rubber seal.
- The name badge for the left or right side must be readable at the top.
- Install the lower speaker. Refer to → Communication; Rep. Gr.91; Component Location Overview - Sound System.
- Install the door trim panel. Refer to → Body Interior; Rep. Gr.70; Rear Door Trim Panels; Rear Door Trim Panel, Removing and Installing.
READ NEXT:
 Door, Adjusting
Special tools and workshop equipment
required
Gauge - Gap Adjustment -3371-
Door Adjustment Template -T40038 /16-
Check the Height Adjustment using the Door Adjustment
Template -T40038 /1
Inner Door Seal, Removing and Installing
Removing
- Remove the rear sill panel strip. Refer to
→ Body Interior; Rep. Gr.70; Passenger Compartment Trim; Sill
Panel Strip, Removing and Installing.
- Remove the u
Overview - Window Regulator
1 - Door
2 - Window Regulator
Removing and installing. Refer to
→ Chapter "Window Regulator, Removing and Installing".
3 - Nut
6 Nm
4 -&nbsSEE MORE:
Hill hold assist
If you take your foot off of the brake pedal when
driving on hills, the braking force will be held for several seconds. At that
time, you can start driving
without the vehicle rolling backward.
Requirement: the driver's door must be closed,
the engine must be on, and the vehicle must be
traveling
Vehicle Diagnosis, Testing and Information Systems
WARNING
During road tests using a vehicle diagnostic and
information system, there is the hazard of extreme to
lethal injuries!
If vehicle diagnostic and information system is
deposited in the action area of an airbag during a road
test, here is the hazard of extreme to letha