Audi Q3: CV Joint, Servicing, Drive Axle with Triple Roller Joint AAR3300i, Mounted in Transmission
Special tools and workshop equipment required
- Tripod Joint Tool -T10065-
- Puller - Driveshaft -T10382-
- Hose Clip Pliers -VAG1275A-
- Torque Wrench 1331 5-50Nm -VAG1331-
- Torque Wrench 1332 40-200Nm -VAG1332-
- Clamping Pliers -VAG1682A-
- Press Plate -VW401-
- Press Plate -VW402-
- Press Piece - Rod -VW408A-
- Press Piece - Multiple Use -VW411-
- Press Piece - 37mm -VW416B-
- Press Piece - Multiple Use -VW447H-
- Slide Hammer Set -VW771-
Removing the Outer CV Joint
- Clamp the drive axle with protective jaws in a vise clamp.
- Fold back boot.
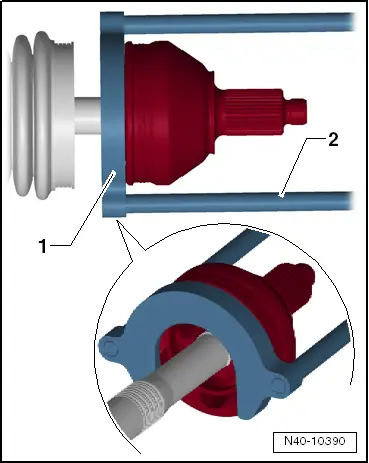
- Align the Puller - Driveshaft -T10382- so that the flat side of the Puller - Driveshaft - Removing Plate -T10382/1- faces the Puller - Driveshaft - Spindles -T10382/2-.
- Attach the Puller - Driveshaft -T10382- to the Slide Hammer Set -VW771-.
- Remove the CV joint from the drive axle using the Puller - Driveshaft -T10382- and Slide Hammer Set -VW771-.
1 - Puller - Driveshaft - Removing Plate -T10382/1-
2 - Puller - Driveshaft - Spindles -T10382/2-
Installing the Outer CV Joint
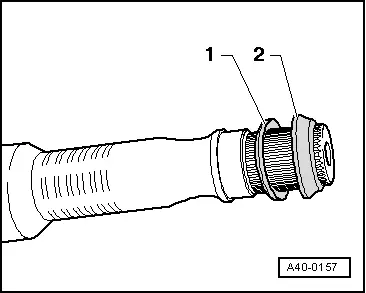
If installed, installed location of the spring washer and thrust washer on outer joint
1 - Plate Spring
2 - Thrust Ring
- Install the new circlips.
- Slide new CV boot onto drive axle if necessary.
- Use a plastic hammer to install it on the shaft until the locking ring locks secure.
Disassembling
- Open both clamps at inner joint and slide back CV boot.
- Remove joint from drive axle.
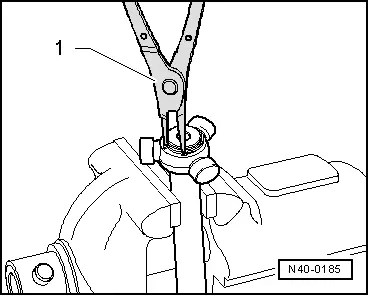
- Remove the circlip.
1 - Pliers (commercially available)
- Insert drive axle into the press.
- Press the triple roller star off the drive shaft.
- Pull off CV boot from shaft.
- Clean shaft, joint and groove for oil seal.
Assembling
- Slide small clamp for joint protective boot onto shaft.
- Slide CV boot onto shaft.
- Slide joint piece onto shaft.
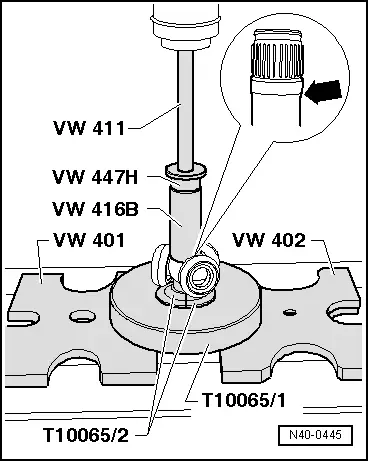
Triple Roller Star, Conical Drive Shaft, Installing
The chamfer on triple roller star faces toward shaft, this is used as an assembly aid.
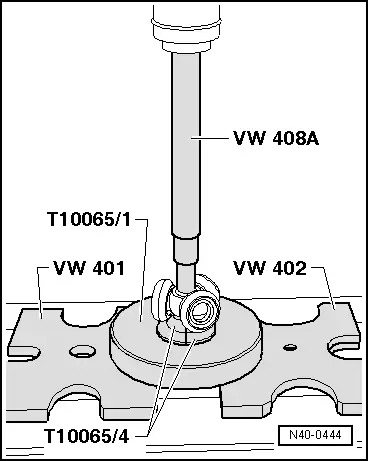
- Install the triple roller star all the way onto the shaft.
- Make sure the pressure does not increase above 3.0 t.
- If necessary coat drive axle splines and triple roller star with Lubricating Paste -G 052 142 A2-.
- Insert securing ring, be sure to fit properly.
- Press half of the joint grease from the repair set into the triple roller joint.
- Slide joint piece over rollers and secure.
- Press the remaining half of the drive axle grease from the repair kit into the rear side of the triple roller joint.
- Install CV boot.
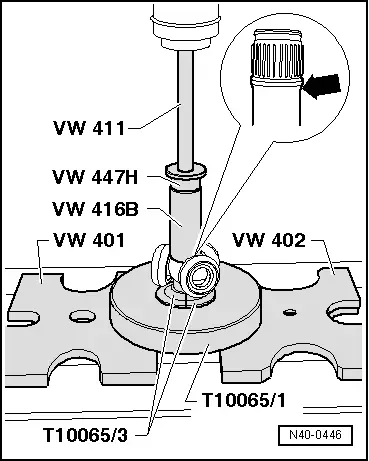
Triple Roller Star, Cylinder Drive Shaft, Installing
- Install the triple roller star all the way onto the shaft.
- Make sure the pressure does not increase above 3.0 t.
- If necessary coat drive axle splines and triple roller star with Lubricating Paste -G 052 142 A2-.
- Insert securing ring, be sure to fit properly.
- Press half of the joint grease from the repair set into the triple roller joint.
- Slide joint piece over rollers and secure.
- Press the remaining half of the drive axle grease from the repair kit into the rear side of the triple roller joint.
- Install CV boot.
- Slide the CV boot onto the joint and mount the clamp.
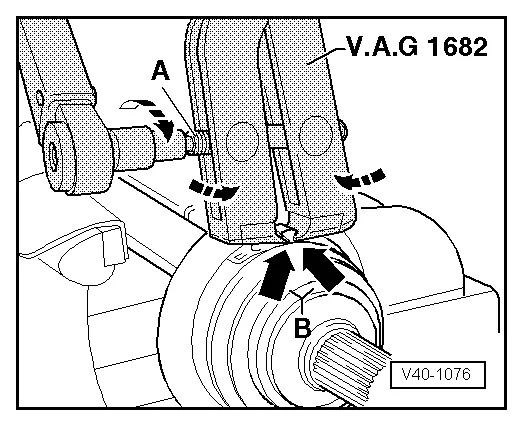
Tightening clamping sleeve on outer joint
- Attach the Clamping Pliers -VAG1682A- as illustrated. When doing this, make sure that edges of clamping pliers are seated in corners -arrows B- of clamp.
- Tension clamp by turning spindle with a torque wrench (do not tilt Clamping Pliers -VAG1682A-).
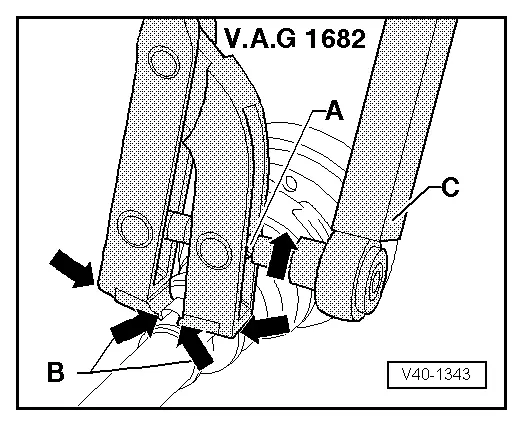
Tensioning Clamp on Small Diameter
![]() Note
Note
- The hard material of the CV boot (compared to rubber) makes it necessary to use a stainless steel hose clamp. It is only possible to tighten the hose clamp with Clamping Pliers -VAG1682A-.
- Tightening specification: 25 Nm.
- Use torque wrench -C- with adjustment range 5 to 50 Nm (for example Torque Wrench 1331 5-50Nm -VAG1331-).
- Make sure the threads on the spindle -A- on the pliers move easily. Lubricate with MOS 2 grease, if necessary.
- If the thread is tight, for example it is dirty, the required tensioning force for the hose clamp will not be achieved in spite of correct torque specification settings.
READ NEXT:
 CV Joint, Servicing, Drive Axle with Triple Roller Joint AAR3300i, Mounted
on Transmission Stub Shaft
CV Joint, Servicing, Drive Axle with Triple Roller Joint AAR3300i, Mounted
on Transmission Stub Shaft
Special tools and workshop equipment
required
Tripod Joint Tool -T10065-
Puller - Driveshaft -T10382-
Hose Clip Pliers -VAG1275A-
Torque Wrench 1331 5-50Nm -VAG1331-
Torque Wrench 1332 4
CV Joint, Servicing, Drive Axle with CV Joint, Inserted with Inner Splines
Special tools and workshop equipment
required
Seal Installer - Bevel Box -T10243-
Torque Wrench 1331 5-50Nm -VAG1331-
Clamping Pliers -VAG1682A-
Press Piece - Multiple Use -VW447H-
Coppe
Outer CV Joint, Checking
It is necessary to disassemble the joint whenever replacing
the grease or if the ball surfaces show wear or damage.
Removing
- Before disassembling mark ball hub position in relation to
theSEE MORE:
Power windows
Opening and closing the windows
Fig. 35 Driver's door: power window switch
Power window switches:
Left front door
Right front door
Left rear door
Right rear door
Opening and closing the windows
The driver can control all power windows. All
power window switches are equipped with a twostage
fu
Overview - Seat Pan, Sill Panel/Tunnel Side Seat Side Trim on Power Front
Seat
1 - Bolt
Quantity: 3
8 Nm
2 - Front Seat
3 - Seat Side Trim on the Tunnel Side
Removing and installing. Refer to
→ Chapter "Seat Side Trim on the Tunnel Side, Removing and Installing".
4 - Expanding Rivet
5 - Sill Pa