
Audi Q3: Charging the 12 volt vehicle battery
Maintenance and Care / Audi Q3 (F3) 2018-2026 Owner's Manual / Charging the 12 volt vehicle battery
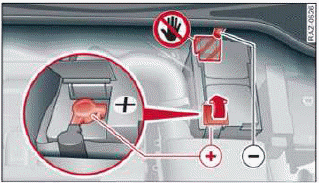
Fig. 152 Engine compartment with battery: connections
for charger and jump start cable
Observe the safety precautions.
Requirement: only use chargers with a maximum charging current of 14.8 volts. The battery cables remain connected.
The battery is located in the engine compartment.
The ground point (-) is always located on the vehicle body.
- Switch off the ignition and all electrical equipment.
- Open the hood.
- Open the cover on the positive terminal
 fig. 152.
- Clamp the terminal clamps on the charger correctly onto the positive terminal/jump start connection (+) and the ground point (-).
- Insert the power cable for the charger into the socket and switch the charger on.
- At the end of the charging process, switch the charger off and pull the power cable out of the socket.
- Remove the charger terminal clamps.
- Close the cover on the positive terminal.
- Close the hood.
WARNING
- A highly explosive mixture of gases can form when charging batteries. Only charge the battery in well-ventilated areas.
- A drained battery can freeze at temperatures
around 32 ºF (0 ºC). Do not charge or
use a frozen or thawed battery. If ice forms, the battery housing can crack
and battery
electrolyte fluid can leak, which increases
the risk of an explosion and chemical burns.
Contact an authorized Audi dealer or authorized Audi Service Facility for more information.
- Do not connect or disconnect the charging cable while charging because this increases the risk of an explosion.
Tips
- Only charge the battery through the connections in the engine compartment.
- Read all of the manufacturer's instructions for the charger before charging the battery.
READ NEXT:
 Windshield washer system
Fig. 153 Engine compartment: washer fluid reservoir cap
Observe the safety precautions.
The windshield washer reservoir
contains the
cleaning solution for the windshield/rear window
and the headli
Service interval display
The service interval display detects when your vehicle
is due for service.
The service interval display works in two stages:
Inspection or oil change reminder: after driving
a certain distance, a mSEE MORE:
During a phone call
Applies to: vehicles with telephone
Depending on your mobile device and the type of
connection, the following options may be available during a call:
End call
Mute
Sending a tone sequence
Press Numbers. You can enter tone sequences
(DTMF) and send them to the other party on the
call.
Hold
Puts t
Driver Assistance Systems Front Camera
Driver Assistance Systems Front Camera Component Location Overview
1 - Retaining Plate
There are different versions. Refer to the Parts Catalog.
With heated windshield
Cannot be separated from the windshield
2 - Retaining Clips
Replace after every removal
3&n
© 2019-2026 Copyright www.auq3.net | 0.0119
