Audi Q3: Windshield Washer System
Overview - Windshield Washer System
Overview - Windshield Washer System, through MY 2014
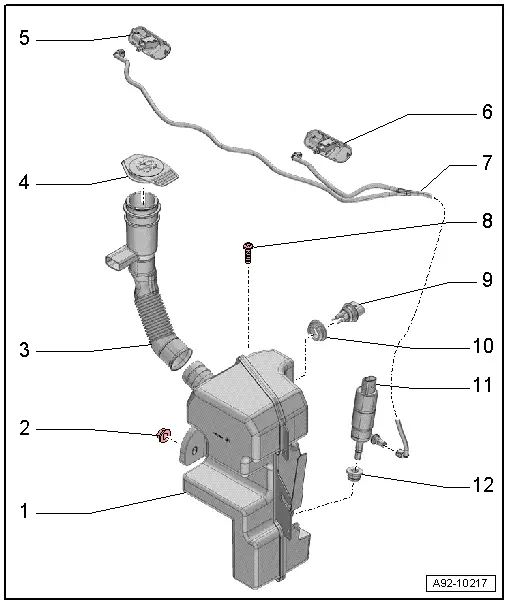
1 - Washer Fluid Reservoir
- Removing and installing. Refer to → Chapter "Windshield Washer Fluid Reservoir, Removing and Installing".
2 - Nut
- 8 Nm
- Quantity: 2
3 - Filler Tube
- For the washer fluid reservoir
- Removing and installing. Refer to → Chapter "Washer Fluid Reservoir Filler Tube, Removing and Installing".
4 - Cap
- For the filler neck
5 - Right Spray Nozzle
- Vehicle equipment version with Right Washer Nozzle Heater -Z21-
- Removing and installing. Refer to → Chapter "Spray Nozzles, Removing and Installing".
- Adjusting. Refer to → Chapter "Spray Nozzles, Adjusting".
6 - Left Spray Nozzle
- Vehicle equipment version with Left Washer Nozzle Heater -Z20-
- Removing and installing. Refer to → Chapter "Spray Nozzles, Removing and Installing".
- Adjusting. Refer to → Chapter "Spray Nozzles, Adjusting".
7 - Washer Fluid Hose
- For the headlamp washer system
8 - Bolt
- 8 Nm
9 - Windshield Washer Fluid Level Sensor -G33-
- Removing and installing. Refer to → Chapter "Windshield Washer Fluid Level Sensor, Removing and Installing".
10 - Grommet
- Replace if damaged.
11 - Windshield Washer Pump -V5-
- Removing and installing. Refer to → Chapter "Windshield Washer Pump, Removing and Installing".
12 - Grommet
- Replace if damaged.
Overview - Windshield Washer System, from MY 2015
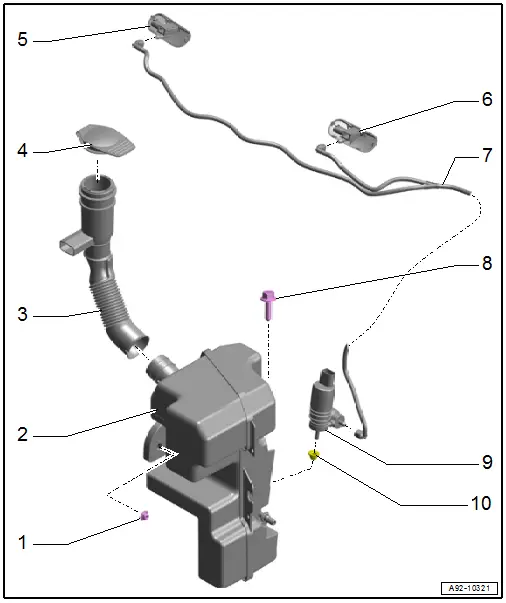
1 - Washer Fluid Reservoir
- With Windshield Washer Fluid Level Sensor -G33- Cannot be replaced separately if faulty.
- Removing and installing. Refer to → Chapter "Windshield Washer Fluid Reservoir, Removing and Installing".
2 - Nut
- 8 Nm
- Quantity: 2
3 - Filler Tube
- For the washer fluid reservoir
- Removing and installing. Refer to → Chapter "Washer Fluid Reservoir Filler Tube, Removing and Installing".
4 - Cap
- For the filler neck
5 - Right Spray Nozzle
- Vehicle equipment version with Right Washer Nozzle Heater -Z21-
- Removing and installing. Refer to → Chapter "Spray Nozzles, Removing and Installing".
- Adjusting. Refer to → Chapter "Spray Nozzles, Adjusting".
6 - Left Spray Nozzle
- Vehicle equipment version with Left Washer Nozzle Heater -Z20-
- Removing and installing. Refer to → Chapter "Spray Nozzles, Removing and Installing".
- Adjusting. Refer to → Chapter "Spray Nozzles, Adjusting".
7 - Washer Fluid Hose
- For the headlamp washer system
8 - Bolt
- 8 Nm
9 - Windshield Washer Pump -V5-
- Removing and installing. Refer to → Chapter "Windshield Washer Pump, Removing and Installing".
10 - Grommet
- Replace if damaged.
Windshield Washer Fluid Reservoir, Removing and Installing
Washer Fluid Reservoir, Removing and Installing
Special tools and workshop equipment required
- Drip tray
Removing
- Remove the washer fluid reservoir filler tube. Refer to → Chapter "Washer Fluid Reservoir Filler Tube, Removing and Installing".
- Vehicles through MY 2014: Remove the left fog lamp. Refer to → Chapter "Fog Lamp, Removing and Installing".
- Vehicles from MY 2015: Remove the headlamp housing. Refer to → Chapter "Headlamp, Removing and Installing".
- Remove the wheel spoiler and the left front wheel housing liner. Refer to → Body Exterior; Rep. Gr.66; Wheel Housing Liner; Front Wheel Housing Liner, Removing and Installing.
- Place a drip tray under the windshield washer fluid reservoir.
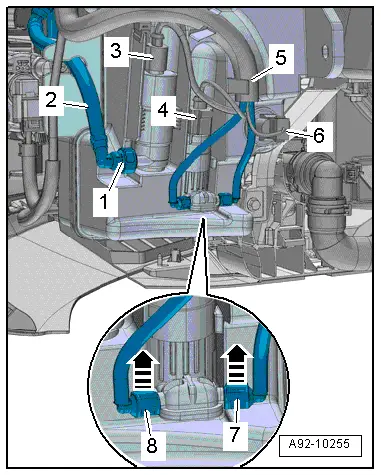
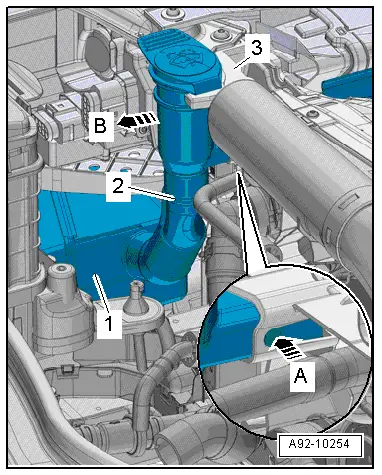
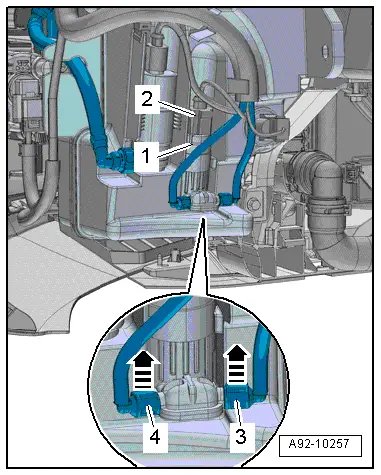
- Disconnect the connectors -3, 4 and 6-, and loosen the wiring harness -5- from the mount on the washer fluid reservoir.
- Release the locking clamps -7 and 8- in direction of -arrows- and remove the water hose from the windshield washer pump.
- Press the release button -1- and remove the water hose -2- from the headlamp washer pump.
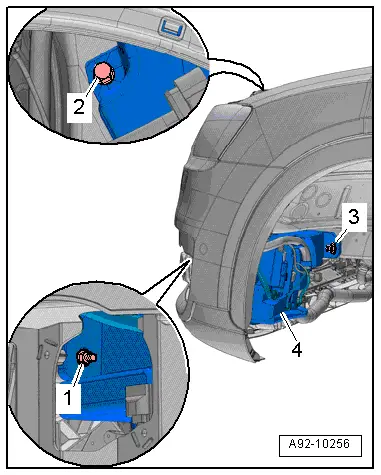
- Remove the nuts -1 and 3- and the bolt -2-.
- Remove the washer fluid reservoir -4-.
Installing
Install in reverse order of removal. Note the following:
- Washer fluid hose must engage audibly into connection for washer fluid pump.
Washer Fluid Reservoir Filler Tube, Removing and Installing
Removing
- If equipped, remove the air filter housing. Refer to → Rep. Gr.23; Air Filter; Air Filter Housing, Removing and Installing or → Rep. Gr.24; Air Filter; Air Filter Housing, Removing and Installing.
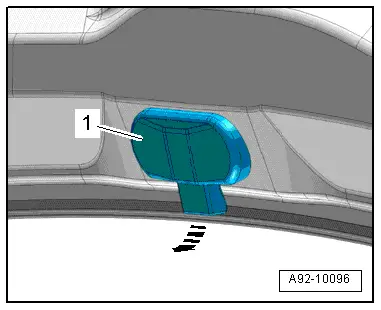
- Remove the filler neck from the bracket -3- in direction of -arrow B-, to do this release the release button in direction of -arrow A-.
- Remove the filler tube -2- with the filler neck from the washer fluid reservoir -1-.
Installing
Install in reverse order of removal. Note the following:
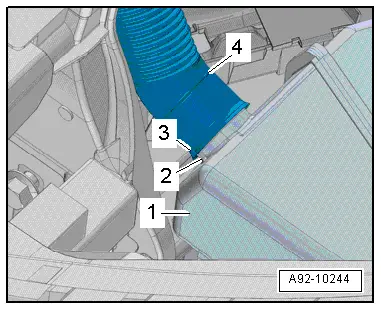
- Push the filler tube -4- all the way onto the windshield washer fluid reservoir -1-.
- The tab -2- must fit into the opening -3- on the filler tube.
Windshield Washer Fluid Level Sensor, Removing and Installing
Special tools and workshop equipment required
- Drip tray
 Note
Note
This procedure applies only to vehicles through MY 2014.
Removing
- Remove the left front wheel spoiler. Refer to → Body Exterior; Rep. Gr.66; Wheel Housing Liner; Front Wheel Housing Liner, Removing and Installing.
- Place a drip tray under the windshield washer fluid reservoir.
- Remove the Windshield Washer Fluid Level Sensor -G33--2- from the washer fluid reservoir.
- Disconnect the connector -1-.
Installing
Install in reverse order of removal. Note the following:
- Remove the grommet from the washer fluid reservoir and check for damage.
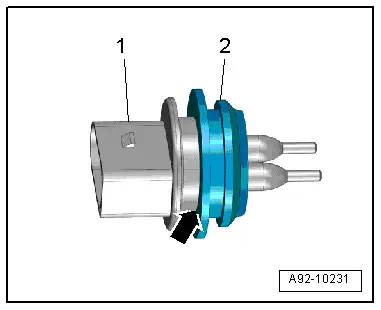
- Push the Windshield Washer Fluid Level Sensor -G33- with grommet in the washer fluid reservoir.
 Note
Note
If the Windshield Washer Fluid Level Sensor -G33-is pushed in with the replaced grommet if the grommet is not seated correctly in the mount the washer fluid reservoir can leak.
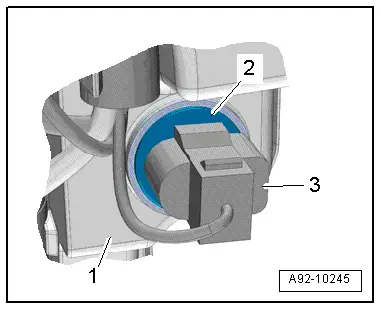
- Push the grommet -2- until the first detent -arrow- on the Windshield Washer Fluid Level Sensor -G33--arrow 1-.
Tightening Specifications
- Wheel spoiler.
Windshield Washer Pump, Removing and Installing
Special tools and workshop equipment required
- Drip tray
Removing
- Remove the left front wheel spoiler. Refer to → Body Exterior; Rep. Gr.66; Wheel Housing Liner; Front Wheel Housing Liner, Removing and Installing.
- Place a drip tray under the windshield washer fluid reservoir.
- Disconnect the connector -2-.
- Release the locking clamps -3 and 4- in direction of -arrows- and remove the water hose from the windshield washer pump -2-
- Remove the windshield washer pump upward from the windshield washer fluid reservoir.
Installing
Install in reverse order of removal. Note the following:
- Check the grommet for damage.
Tightening Specifications
- Wheel spoiler.
Spray Nozzles, Removing and Installing
Removing
- Unclip the spray nozzle -1- for the windshield washer system from the hood -arrow-.
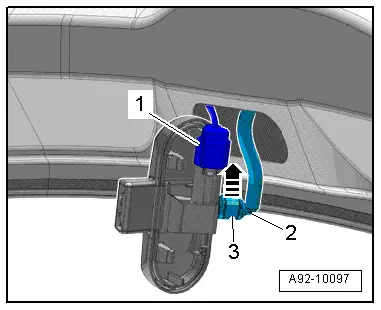
- Open the clip -3- in direction of -arrow- and disconnect the washer fluid hose -2- from the windshield washer spray nozzle.
- Disconnect the connector -1-, if applicable.
Installing
Install in reverse order of removal. Note the following:
- When connecting the washer fluid line, ensure that the securing clip engages audibly into the washer fluid line connection.
- Install the windshield washer spray nozzle into the hood.
Spray Nozzles, Adjusting
- Adjust the windshield washer spray nozzles.
- If the spray field does not correspond to the specifications, clean dirty spray jet.
Cleaning the Nozzle:
 Caution
Danger of damage.
Do not use any objects to clean the spray nozzles!
- Remove the spray nozzle. Refer to → Chapter "Spray Nozzles, Removing and Installing".
- Rinse the spray nozzle with clean water opposite the spray direction.
- To remove any remaining impurities, the nozzle must only be blown out opposite to spray direction using compressed air.
- If the spray field still does not correspond to the specifications, replace the spray nozzle.
READ NEXT:
 Rear Window Wiper System
Overview - Rear Window Washer System
1 - Water Hose
For the rear window washer system
2 - Nut
8 Nm
3 - Rear Window Wiper Motor -V12-
Removing and ins
Rear Window Washer System
Overview - Rear Window Washer System
1 - Windshield Washer Fluid Reservoir
The combined washer fluid reservoir for the front and rear washer
systems is located in the left wheel hou
Headlamp Washer System
Overview - Headlamp Washer System
1 - Washer Fluid Hose
For the right spray nozzle
2 - Bolt
0.9 Nm
Quantity: 2
3 - Right Spray Nozzle
Removing and
SEE MORE:
Modular Wiring Routing with Corrugated Tube
Opening the corrugated tube and removing the individual wire
WARNING
Follow all safety precautions when working with
pyrotechnic components. Refer to
→ Chapter "Pyrotechnic Components Safety Precautions".
Before handling pyrotechnic components (for example,
disconnectin
Antenna Amplifier, Removing and Installing
Antenna Amplifier -R24-, Removing and Installing
The Antenna Amplifier -R24- is located on the upper left of
the rear lid.
Removing
- Turn off the ignition and all electrical equipment and
remove the ignition key.
- Remove the upper rear lid trim panel. Refer to
→ Body Inte
