Audi Q3: Overview - Rear Door Trim Panel
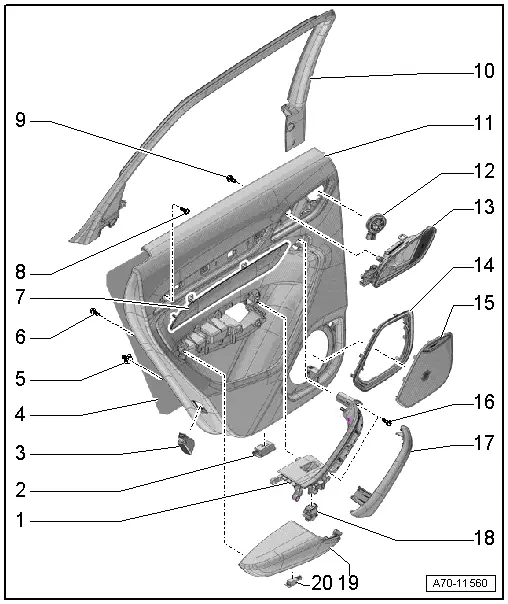
1 - Pull Handle
- With switch mount
- Removing and installing. Refer to → Chapter "Rear Pull Handle, Removing and Installing".
2 - Left Rear Entry Lamp -W33-
- Right: Right Rear Entry Lamp -W34-
- Equipment levels
- Removing and installing. Refer to → Electrical Equipment; Rep. Gr.96; Lamps; Rear Entry Lamp W33/W34 Removing and Installing.
3 - Rear Reflector
- Vehicles with a Left Rear Door Warning Lamp -W37-
- Vehicles with a Right Rear Door Warning Lamp -W38-
- Removing and installing the door warning lamp bulbs. Refer to → Electrical Equipment; Rep. Gr.96; Lamps.
4 - Insulation
5 - Clip
- Quantity: 6 one-piece
- Quantity: 1 two-piece
- Replace any damaged two-piece clips
6 - Bolt
- 1.2 Nm
- For pull handle/armrest
- Quantity: 13
7 - Trim Molding
- The removal and installation is described for the front door and is similar for the rear door. Refer to → Chapter "Trim Molding, Removing and Installing".
- Insert in the door trim panel and press on it until it engages audibly.
8 - Bolt
- For door trim panel
- 2.5 Nm
9 - Bolt
- For inside door release mechanism
- Quantity: 4
- 1.2 Nm
10 - Trim Panel
- For the window frame
- Removing and installing. Refer to → Chapter "Window Frame Trim Panel, Removing and Installing".
11 - Rear Door Trim Panel
- Removing and installing. Refer to → Chapter "Rear Door Trim Panel, Removing and Installing".
12 - Treble Speaker
- Equipment levels
- Removing and Installing. Refer to → Communication; Rep. Gr.91; Sound System; Left/Right Rear Treble Speaker R14/R16 Removing and Installing.
13 - Interior Door Mechanism
- Removing and installing. Refer to → Chapter "Interior Door Mechanism, Removing and Installing".
14 - Frame
- For the speaker trim
- Vehicles with: Speaker Ambient Lighting Bulb 1 -L211-/Speaker Ambient Lighting Bulb 2 -L212-
15 - Speaker Trim
- For bass speaker
- The removal and installation is described for the front door and is similar for the rear door. Refer to → Chapter "Bass Speaker Trim, Removing and Installing".
- Press on until it engages audibly
16 - Bolt
- 2.5 Nm
- For door trim panel
- Quantity: 2
17 - Grip Recess
- for pull handle
- The removal and installation is described for the front door and is similar for the rear door. Refer to → Chapter "Pull Handle Grip Recess, Removing and Installing".
18 - Left Rear Power Window Switch in Left Rear Door -E52-
- Right: Right Rear Window Switch in Right Rear Door -E54-
- Removing and Installing. Refer to → Electrical Equipment; Rep. Gr.96; Controls; Rear Door Controls Component Location Overview.
19 - Armrest
- Removing and installing. Refer to → Chapter "Rear Armrest, Removing and Installing".
20 - Left Rear Door Storage Compartment Illumination Bulb -L170-
- Right: Right Rear Door Storage Compartment Illumination Bulb -L171-
- Removing and installing. Refer to → Electrical Equipment; Rep. Gr.96; Left/Right Rear Door Storage Compartment Illumination Bulb L170/L171 Removing and Installing.
READ NEXT:
 Interior Door Mechanism, Removing and Installing
Removing
- Remove the rear door trim panel. Refer to
→ Chapter "Rear Door Trim Panel, Removing and Installing".
- Remove insulation mat.
- Disconnect and free up the connecto
Component Location Overview - Instrument Panel
1 - Center Console
Overview. Refer to
→ Chapter "Overview - Center Console".
2 - Driver Side Instrument Panel Cover
Overview. Refer to
→ Chapter "Ove
Instrument Panel Side Cover, Removing and Installing
Special tools and workshop equipment
required
Trim Removal Wedge -3409-
Removing
- Pry off the cover -1- for the
instrument panel side cover using the Trim Removal Wedge -3409--arrow-SEE MORE:
Advanced airbag system
Fig. 64 Headliner: indicator light to display the
status of the front passenger's airbag
The Advanced Airbag System in your vehicle has
been certified to comply with the requirements
of the United States Federal Motor Vehicle Safety
Standard (FMVSS) 208, as well as Canada Motor
Vehicle Safety Stan
Storage areas and compartments
Depending on vehicle equipment, there are a variety
of storage areas, compartments, and retainers,
such as the glove compartment, for safely
storing and securing objects.
WARNING
To reduce the risk of injury, make sure all
storage compartments are always closed
while driving.
Loose objects can
© 2019-2026 Copyright www.auq3.net | 0.0117
