Audi Q3: Locking Mechanism Trim, Removing and Installing
Special tools and workshop equipment required
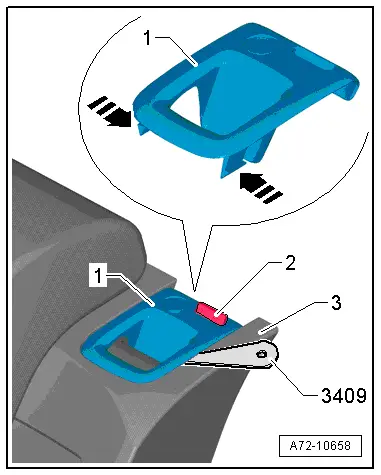
- Trim Removal Wedge -3409-
Removing
- Unlock the rear seat backrest.
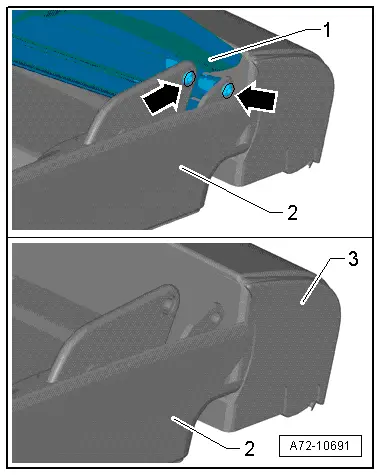
- Make sure the button -2- (indicator) is in the "up" position.
- Push the tabs -arrows- on both sides of the trim using a Trim Removal Wedge -3409-.
- Remove the trim -1- upward and off the rear seat backrest -3-.
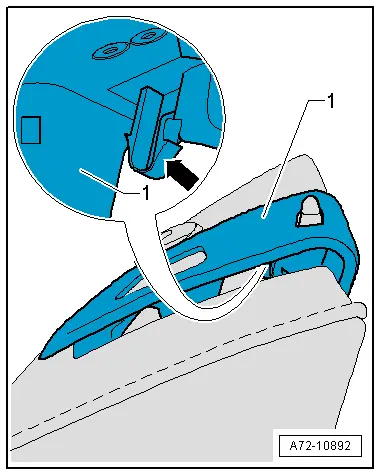
- Remove the trim -1- as far as possible upward from the rear seat backrest.
- Pry the catch -arrow- out of the locking mechanism using a flat blade screwdriver.
- Remove the trim upward from the rear seat backrest.
Installing
Install in reverse order of removal. Note the following:
- Make sure the button moves easily after installing the trim.
Installation notes, for example tightening specifications, replacing components. Refer to → Chapter "Overview - Locking Mechanism".
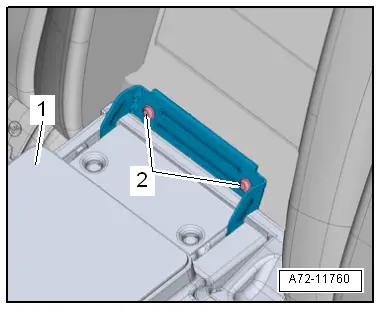
Rear Seat Backrest Locking Mechanism, Removing and Installing
Removing
- Remove the rear seat backrest. Refer to → Chapter "Rear Seat Backrest, Removing and Installing".
- Remove the headrest. Refer to → Chapter "Headrest, Removing and Installing".
- Remove the padding on the rear seat backrest around the locking mechanism. Refer to → Chapter "Cover and Cushion, Removing and Installing, Backrest".
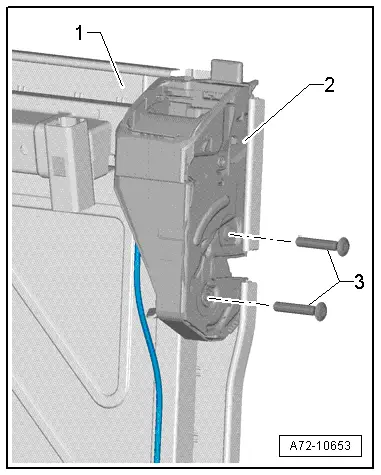
- Remove the bolts -3-.
- Remove the locking mechanism -2- from the rear seat backrest frame -1-.
Installing
Install in reverse order of removal.
Installation notes, for example tightening specifications, replacing components. Refer to → Chapter "Overview - Locking Mechanism".
Pass-Through Cover Frame, Removing and Installing
Special tools and workshop equipment required
- Pry Lever -80-200-
Removing
- Fold down the rear center armrest and open the pass-through door.
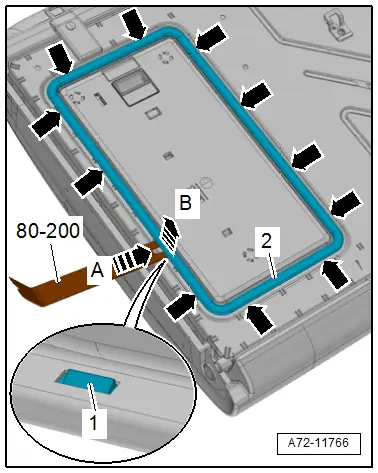
- Release the cover frame retaining tabs -1- from the rear seat backrest; to do this push with the Pry Lever -80 - 200- on the cover frame -arrow A-.
- Pry the cover frame -2- from the rear seat backrest -arrow B-.
- Repeat the procedure for the rest of the retaining tabs -arrows-.
Installing
Install in reverse order of removal. Note the following:
- Make sure the cover frame engages completely in the rear seat backrest.
Installation notes, for example tightening specifications, replacing components. Refer to → Chapter "Overview - Center Armrest".
Pass-Through Cover, Removing and Installing
Removing
- Fold down the center armrest and open the pass-through door.
- Remove the bolts -2-.
- Remove the center armrest with the cover -1- for the pas through door.
- Fold up the rear center armrest -1-2/3.
- Remove the bolts -arrows-.
- Remove the pass-through door -2- from the center armrest.
- Remove the lower center cushion -3-. Refer to → Chapter "Center Cushion, Removing and Installing".
Installing
- Install the pass-through door -1- and the center armrest and tighten the bolts hand tight.
- Close the pass-through door and align.
- Tighten the bolts -2- on the rear seat backrest.
Install in reverse order of removal.
Installation notes, for example tightening specifications, replacing components. Refer to → Chapter "Overview - Center Armrest".

READ NEXT:
 Center Armrest, Removing and Installing
Center Armrest, Removing and Installing
Removing
- Fold up the rear center armrest 2/3.
- Remove the bolts -arrows-.
- Remove the rear center armrest -1-
from the pass-through doo
Overview - Seat Pan Cover and Cushion
Overview - Seat Pan Cover and Cushion, Standard/Folding Seat
Note
The illustration shows versions with a fabric cover.
1 - Seat Pan
2 - Seat Cushion
Seat cover aSEE MORE:
Unlocking and locking the vehicle
Fig. 26 Door handle: sensor for locking the vehicle
Depending on the vehicle equipment, you may
have various options for unlocking and locking
your vehicle. The settings in the MMI specify
which doors will unlock.
Unlocking or locking using the vehicle key
buttons
To unlock the vehicle, press the
Wheel, Changing and Mounting
Special tools and workshop equipment
required
Torque Wrench 1332 40-200Nm -VAG1332-
Wheel Lock Set -T10101-
Wheel Lock Set -T10101A-
Wheel Lock Set -T40004-
Wheel Lock Set -T40073-
Wax Spray -D 322 000 A2-
Optimol TA Paste -G 052 109 A2-
Note
The wrench size of the inc