
Audi Q3: Cargo floor
Starting and driving / Audi Q3 (F3) 2018-2026 Owner's Manual / Cargo floor
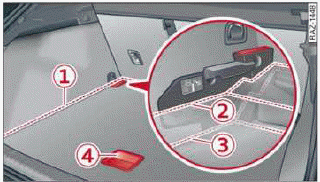
Fig. 76 Luggage compartment: lowering the cargo floor
Removing and installing the cargo floor
- To remove the cargo floor, lift it by the handle 4.
- Pull the cargo floor toward the vehicle rear, out of the luggage compartment.
- To insert the cargo floor, push it all the way toward the backrest.
Lowering/raising the cargo floor
Applies to: vehicles with adjustable cargo floor
The height of the cargo floor can be adjusted to.
create more space in the luggage compartment or to make loading and unloading easier.
- To lower the cargo floor, lift it at the handle 4.
- Pull the cargo floor slightly back and then push it forward again to position 2 or 3.
- To raise the cargo floor, remove it and reinsert it in position 1.
Audi recommends moving the cargo floor back into position 1 after transporting goods.
Depending on vehicle equipment, there may be a middle floor panel under the adjustable cargo floor. Remove the middle floor panel to reach the vehicle tool kit located below.
READ NEXT:
 Roof rack
General information
Applies to: vehicles with roof rack mount
Fig. 77 Roof rail: mounting points
If luggage or cargo is to be carried on the roof,
you must observe the following:
These roof racks a
Climate control system
Description
One of the following options may be available,
depending on vehicle equipment:
A deluxe automatic climate control system with
two zones to individually adjust temperature and air distriSEE MORE:
Cruise control system
Description
Applies to: vehicles with cruise control system
The cruise control system assists the driver in
maintaining a constant speed above approximately
15 mph (20 km/h). The system maintains
the desired speed by braking and accelerating.
WARNING
Observe the safety precautions and note the
li
Wheel Electronics, New Design
Assembly Sequence
- Fold the valve -1- downward
-arrow A toward B-.
- Slide the valve with the wheel electronics attached through
the valve opening in the rim.
- Rotate the union nut -2- three
turns on the valve -1-.
- Tighten the union nut -2- until
the bar breaks w
© 2019-2026 Copyright www.auq3.net | 0.0099
