Audi Q3: Overview - Electric Vacuum Pump
Audi Q3 (8U) 2011-2018 Service Manual / Chassis / Brake System / Hydraulic Components / Overview - Electric Vacuum Pump
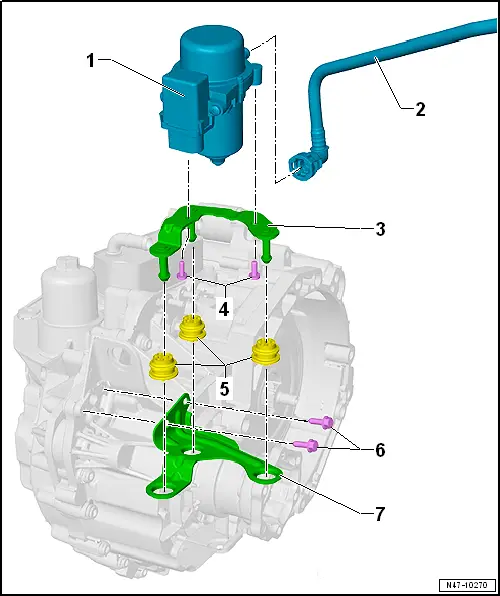
1 - Brake System Vacuum Pump -V192-
- Allocation, refer to the Parts Catalog.
- Installed location: in the engine compartment over the engine transmission separating point.
- Do not disassemble
- Removing and installing, refer to → Chapter "Electric Vacuum Pump, Removing and Installing".
2 - Vacuum Line
- With brake booster pressure sensor
- Allocation, refer to the Parts Catalog.
3 - Bracket
4 - Bolt
- 8 Nm
- Quantity: 2
5 - Rubber Insulation
- Quantity: 3
- Do not press out of bracket when installing
6 - Bolt
- 25 Nm
7 - Bracket
- Secured on the transmission
Overview - Vacuum Pump
Overview - Vacuum Pump, Vehicles with 2.0L TFSI Engine
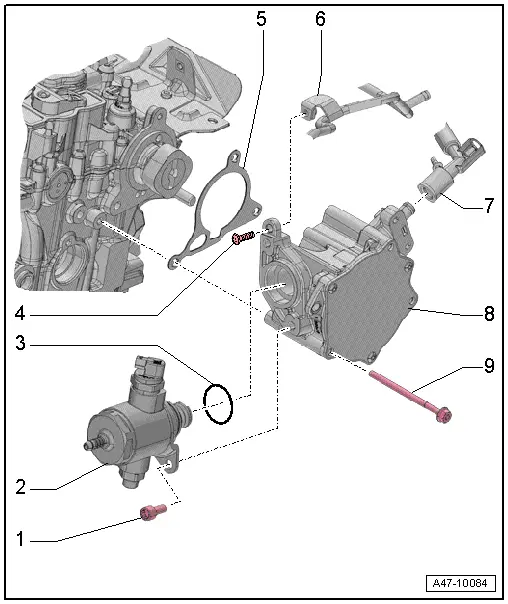
1 - Bolt
- Tightening specification, refer to → Engine Mechanical, Fuel Injection and Ignition; Rep. Gr.24; High Pressure Pump; Overview - High Pressure Pump.
2 - High Pressure Pump
- Removing and installing, refer to → Rep. Gr.24; High Pressure Pump; High Pressure Pump, Removing and Installing.
3 - O-Ring
4 - Bolt
- 9 Nm
5 - Seal
- Replacing
6 - Coolant Line
7 - Vacuum Hose
- With Vacuum Sensor -G608-
- Replace vacuum hose if damaged
- Vacuum Sensor -G608-, removing and installing, refer to → Chapter "Vacuum Sensor -G608-, Removing and Installing".
8 - Vacuum Pump
- The vacuum pump is mechanically driven.
- Vacuum system, checking, refer to → Chapter "Vacuum System, Checking".
- Removing and installing, refer to → Chapter "Vacuum Pump, Removing and Installing, Vehicles with 2.0L TFSI Engine".
9 - Bolt
- 9 Nm
Overview - Vacuum Pump, Vehicles with TDI Engine
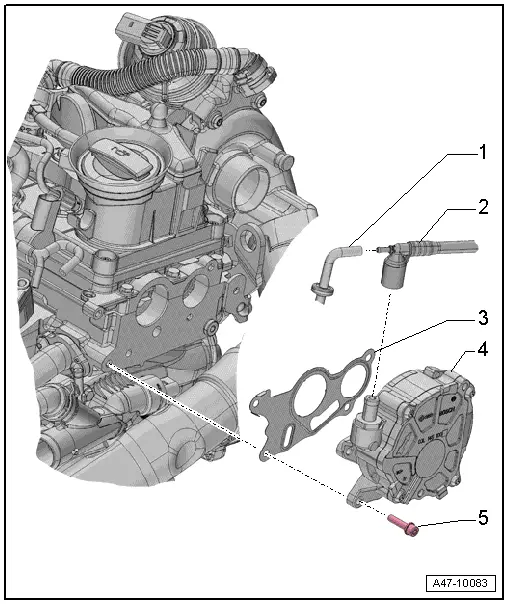
1 - Vacuum Hose
- Replace if damaged
2 - Vacuum Line
- Replace if damaged
3 - Seal
- Replacing
4 - Vacuum Pump
- The vacuum pump is mechanically driven.
- Vacuum System, Checking, refer to → Chapter "Vacuum System, Checking".
- Removing and installing, refer to → Chapter "Vacuum Pump, Removing and Installing, Vehicles with TDI Engine".
5 - Bolt
- 9 Nm
READ NEXT:
 Check Valve, Checking
Check valve is removed, refer to
→ Chapter "Check Valve, Removing and Installing".
Note
The check valve is installed directly in front of the vacuum
pump.
Valve must all
Vacuum Sensor -G608-, Removing and Installing
Removing
Audi Q3:
- Open the clamps -arrows- and
remove the air guide pipe -1-.
- Disconnect the connector -2-.
- Remove the vacuum hose -3-.
Audi RS Q3:
- Loosen the h
Vacuum Pump, Removing and Installing
Vacuum Pump, Removing and Installing, Vehicles with 2.0L TFSI Engine
Removing
- Remove the engine cover, refer to
→ Rep. Gr.10; Engine Cover; Engine Cover, Removing and
Installi
SEE MORE:
Uniform tire quality grading
Tread wear
Traction AAA BC
Temperature ABC
Quality grades can be found where applicable on
the tire side wall between tread shoulder and
maximum section width fig. 154.
For example: Tread wear 200, Traction AA, Temperature
A.
All passenger car tires must conform to Federal
Safety Requirement
Limitations
Applies to: vehicles with adaptive cruise assist
Fig. 95 Example: vehicle changing lanes and stationary vehicle
Fig. 96 Example: driving into a curve
In some situations, the adaptive cruise assist
function is limited and you must assume control
of the vehicle when necessary, for example by applyin
© 2019-2025 Copyright www.auq3.net
